
Snowflake Integration
The Snowflake integration requires a Key-Pair Authentication (one private, one public) in order to authorize requests to the Snowflake REST API.
Generating Keys
Private Key
Depending on which one of the Supported Snowflake Clients you use to connect to Snowflake, you have the option to generate encrypted or unencrypted private keys. Generally, it is safer to generate encrypted keys. Snowflake recommends communicating with your internal security and governance officers to determine which key type to generate prior to completing this step.
NoteThe command to generate an encrypted key prompts for a passphrase to regulate access to the key. Snowflake recommends using a passphrase that complies with PCI DSS standards to protect the locally generated private key. Additionally, Snowflake recommends storing the passphrase in a secure location. If you are using an encrypted key to connect to Snowflake, enter the passphrase during the initial connection. The passphrase is only used for protecting the private key and will never be sent to Snowflake.
To generate a long and complex passphrase based on PCI DSS standards:
- Access the PCI Security Standards Document Library.
- For PCI DSS, select the most recent version and your desired language.
- Complete the form to access the document.
- Search for Passwords/passphrases must meet the following: and follow the recommendations for password/passphrase requirements, testing, and guidance. Depending on the document version, the phrase is likely located in a section called
Requirement 8: Identify and authenticate access to system componentsor a similar name.
-
To start, open a terminal window and generate a private key
a. To generate an unencrypted version, use the following command:openssl genrsa 2048 | openssl pkcs8 -topk8 -inform PEM -out rsa\_key.p8 -nocrypt
b. To generate an encrypted version, use the following command, which omits
-nocrypt:openssl genrsa 2048 | openssl pkcs8 -topk8 -v2 des3 -inform PEM -out rsa_key.p8
-
The commands generate a private key in PEM format
-----BEGIN ENCRYPTED PRIVATE KEY-----
MIIE6T...
-----END ENCRYPTED PRIVATE KEY-----
Public Key
-
From the command line, generate the public key by referencing the private key. The following command assumes the private key is encrypted and contained in the file named
rsa_key.p8.openssl rsa -in rsa_key.p8 -pubout -out rsa_key.pub
-
The command generates the public key in PEM format:
-----BEGIN PUBLIC KEY-----
MIIBIj...
-----END PUBLIC KEY-----
Copy the public and private key files to a local directory for storage. Record the path to the files. Note that the private key is stored using the PKCS#8 (Public Key Cryptography Standards) format and is encrypted using the passphrase you specified in the previous step.
ImportantThe file should still be protected from unauthorized access using the file permission mechanism provided by your operating system. It is your responsibility to secure the file when it is not being used.
Grant the Privilege to Assign a Public Key to a Snowflake User
To assign a public key to a user, you must have one of the following roles or privileges.
- The MODIFY PROGRAMMATIC AUTHENTICATION METHODS or OWNERSHIP privilege on the user.
- The SECURITYADMIN role or higher.
You can use the GRANT <privileges> … TO ROLE or GRANT OWNERSHIP command to grant the MODIFY PROGRAMMATIC AUTHENTICATION METHODS or OWNERSHIP privilege on the user to a role.
For example, suppose that you want to users with the my_service_owner_role custom role to assign the public key to the service user my_service_user. The following statement grants the MODIFY PROGRAMMATIC AUTHENTICATION METHODS privilege on the my_service_user user to the role my_service_owner_role:
GRANT MODIFY PROGRAMMATIC AUTHENTICATION METHODS ON USER my_service_user
  TO ROLE my_service_owner_role;
Assign the Public Key to a Snowflake User
To assign the public key to the user, execute an ALTER USER command to set the RSA_PUBLIC_KEY property of the user. For example:
ALTER USER example_user SET RSA_PUBLIC_KEY='MIIBIjANBgkqh...';
NoteExclude the public key delimiters in the SQL statement.
Verify the User’s Public Key Fingerprint
-
Execute the following command to retrieve the user’s public key fingerprint:
DESC USER example_user;
SELECT SUBSTR((SELECT "value" FROM TABLE(RESULT_SCAN(LAST_QUERY_ID()))
  WHERE "property" = 'RSA_PUBLIC_KEY_FP'), LEN('SHA256:') + 1);
With the output:
Azk1Pq...
-
Copy the output.
-
Run the following command on the command line:
openssl rsa -pubin -in rsa_key.pub -outform DER | openssl dgst -sha256 -binary | openssl enc -base64
With the output:
writing RSA key
Azk1Pq...
-
Compare both outputs. If both outputs match, the user correctly configured their public key.
Add Configuration
-
Navigate to the Integrations tab using the left-hand menu, and select Snowflake.

-
Click the Add Configuration button and fill in the details below:

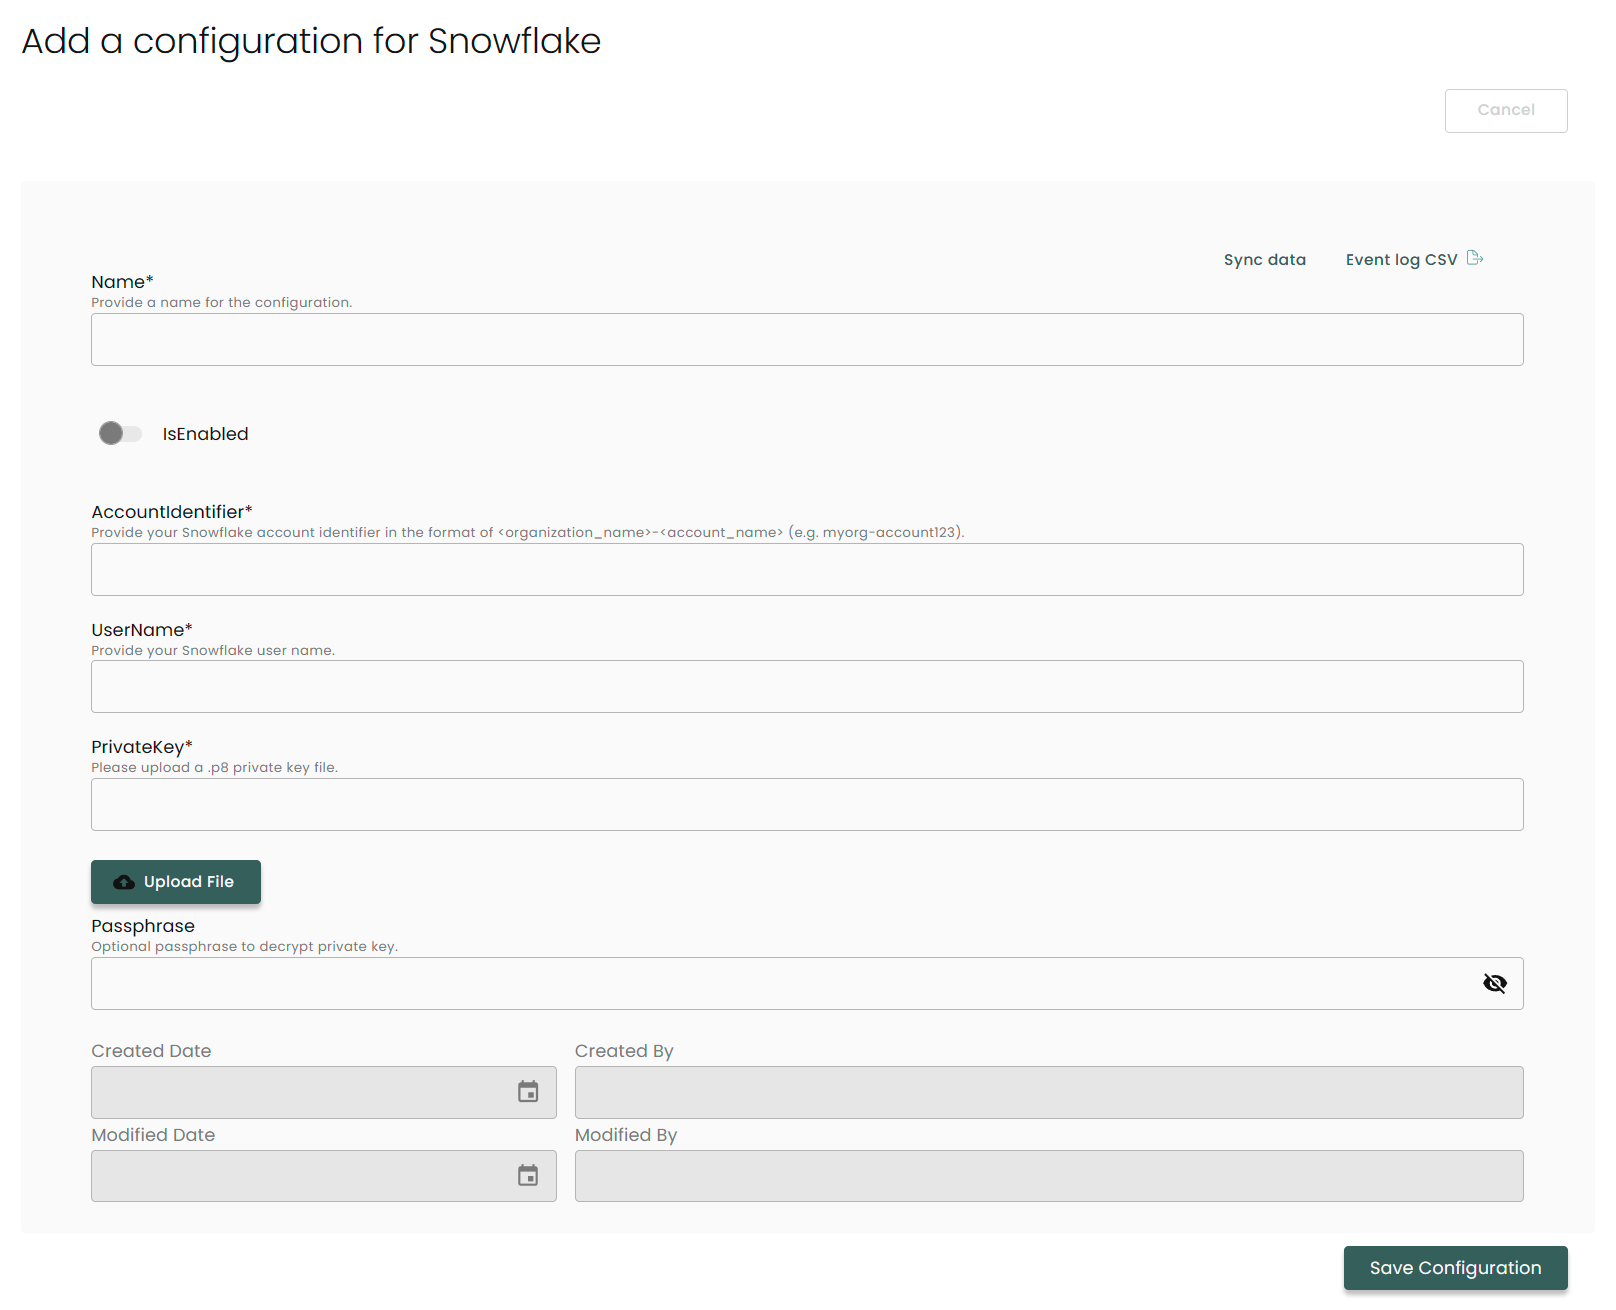
Name: Enter the name of the integration
is Enabled: Toggle button to ensure data is populated into Compyl
Account Identifier: Snowflake account identifier in format of <organization_name>-<account_name> (e.g. myorg-account123)
User Name: Snowflake user name of the individual who was assigned the public key
Private Key: The generated private RSA key as a .p8 file
[Optional] Passphrase: If the RSA key is encrypted include the passphrase
Once you have completed filling out the form click Save Configuration.
NoteTo check if the integration is connected, navigate to the Integrations page in Compyl. If the Status icon shows an unbroken link in the right-hand corner, your integration is properly connected.

This integration syncs daily.
To query the data from the integration, refer to the Query Builder article.
Updated 2 months ago