
Google Cloud Platform Integration
Integrate Google Cloud to enable Compyl to pull data from GCP and Google Workspace to support your compliance needs.
PrerequisitesThe necessary credentials to integrate with Google Cloud include a uniquely generated email address and at least one public/private key pair. If domain-wide delegation is enabled, then a Client ID is also needed.
If your application runs on Google App Engine, a service account is set up automatically when you create your project. This service account is where you can find the credentials needed to set up a Google Cloud integration with Compyl.
If your application runs on Google Compute Engine, a service account is also set up automatically when you create your project, but you must specify the scopes that your application needs access to when you create a Google Compute Engine instance. For more information, see Preparing an instance to use service accounts.
If your application doesn't run on Google App Engine or Google Compute Engine, you must obtain these credentials in the Google API Console. You will need to generate service-account credentials, or to view the public credentials that you've already generated.
Enabling the required APIs and creating the Project
-
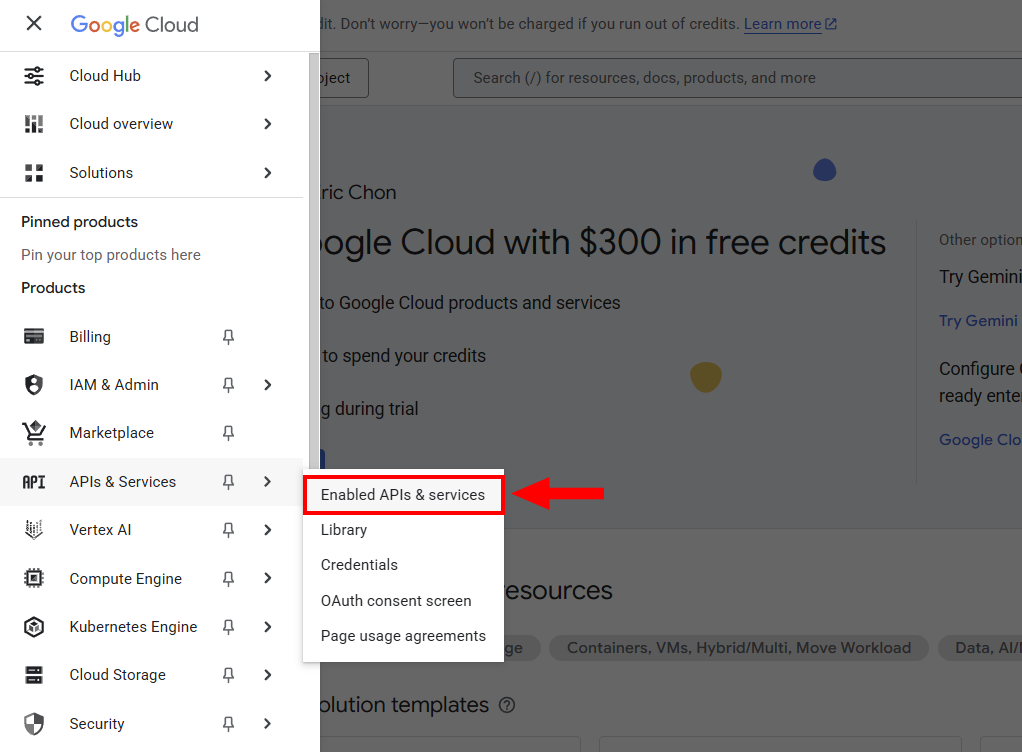
Open the navigation menu (☰) & select Enable APIs & Services.
-
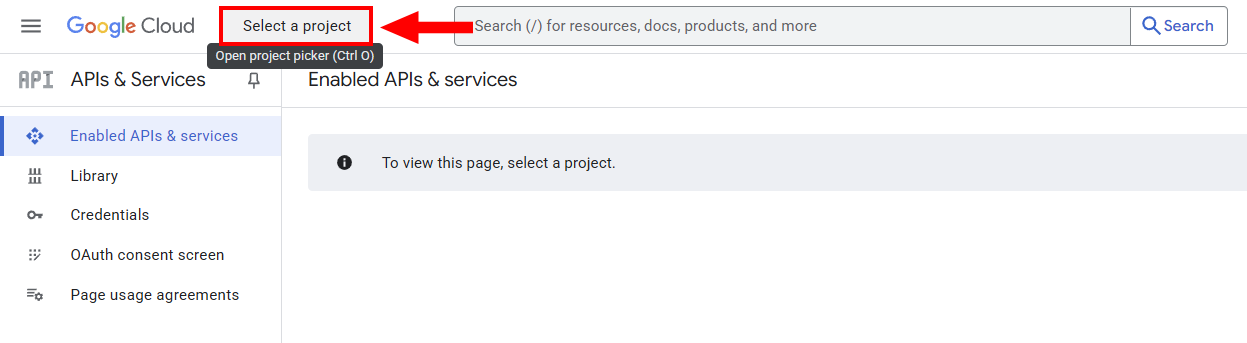
Click Select a project.
-
You can either create a new project or select a new one. The main thing is that the project is under the organization containing the resources you want to monitor in Compyl.
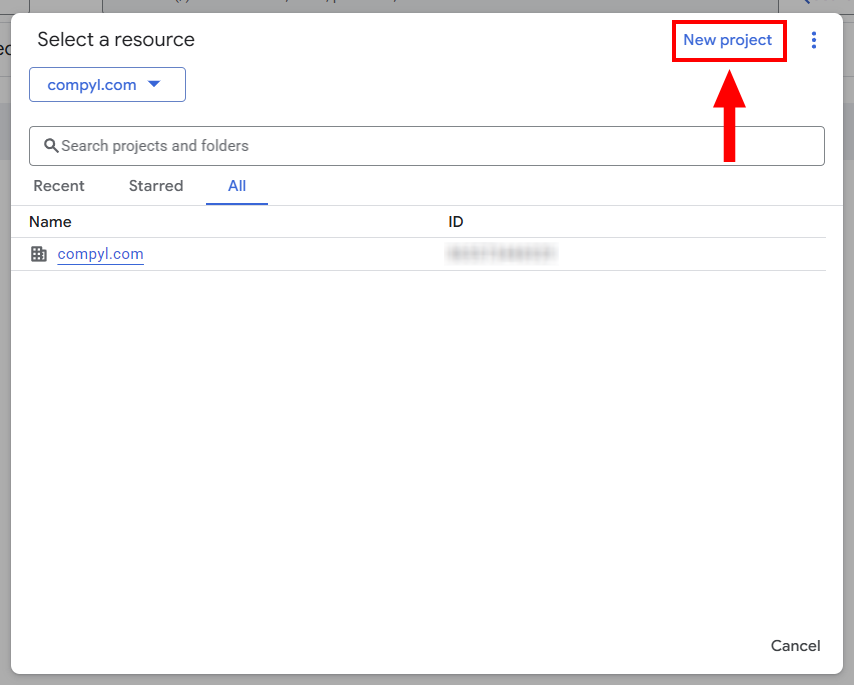
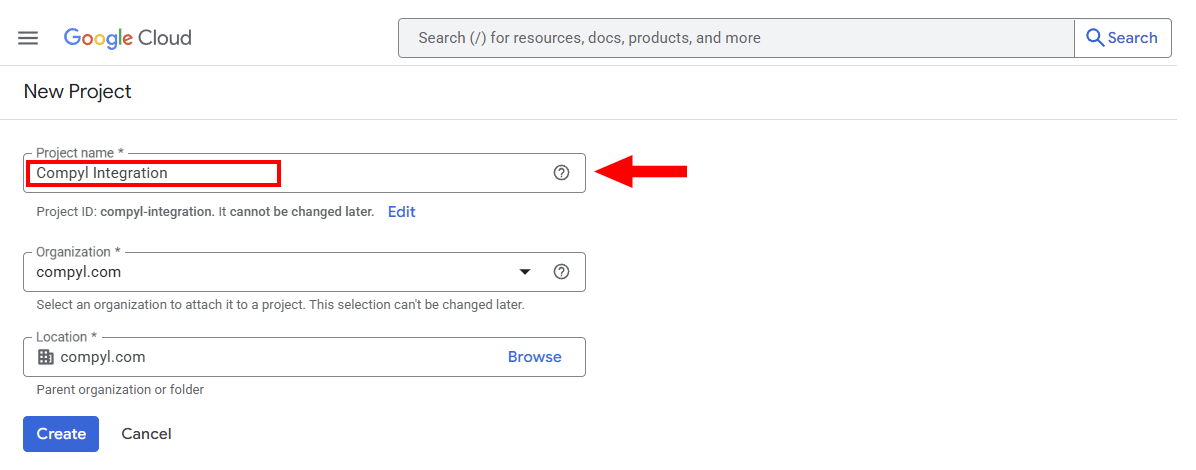
If you create a new one, be aware of the above and give it a name:
-
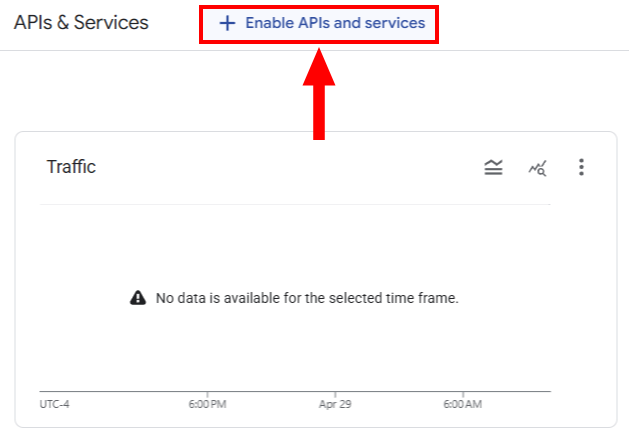
After selecting or creating a project, Click Enable API and Services.
-
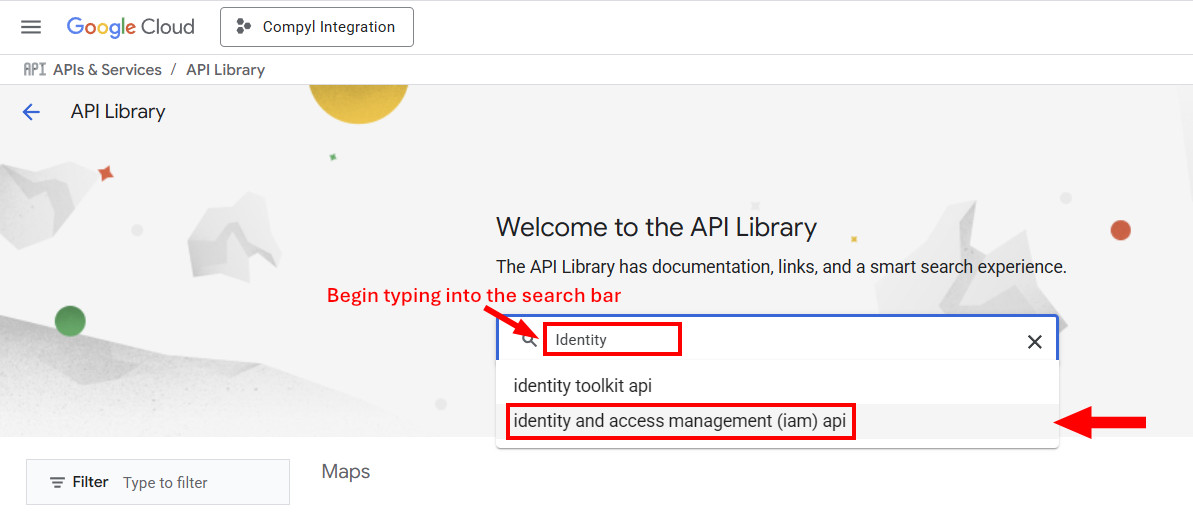
Search for and select the API that you would like to connect with Compyl. In this example, we typed in Identity in the search bar and selected the correct API in the dropdown:
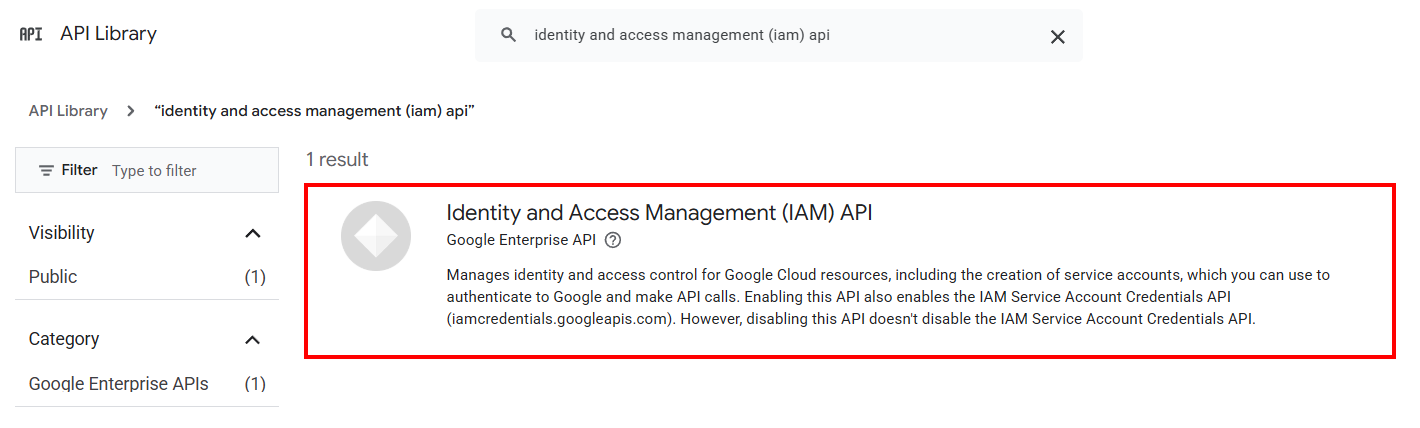
We then selected the API on the next screen:
And finally clicked on Enable to add it to our project:
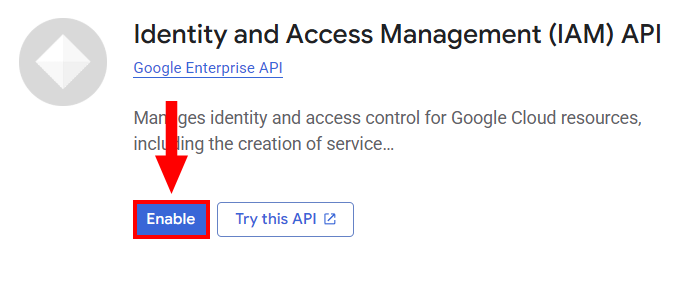
Add all of the following APIs following from Step 6 onward.
| Google Cloud Platform APIs |
|---|
| Admin SDK API |
| IAM API |
| Cloud Resource Manager API |
| Essential Contacts API |
| Cloud Logging API |
Adding Principals to the Project
-
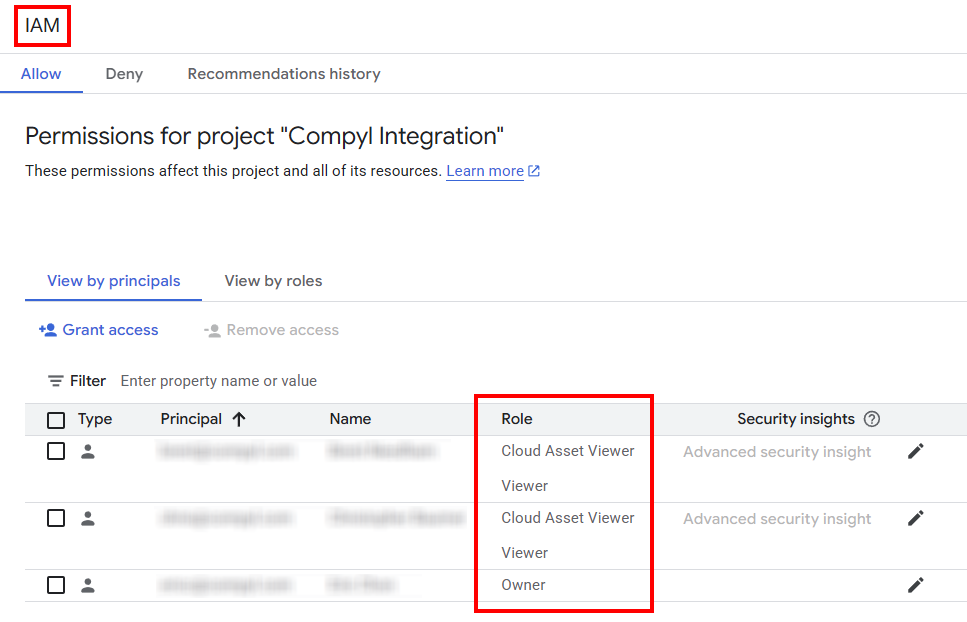
Navigate to IAM from the left-hand menu. You'll see a list of current principals and their role. To add an additional principal, click on Grant access
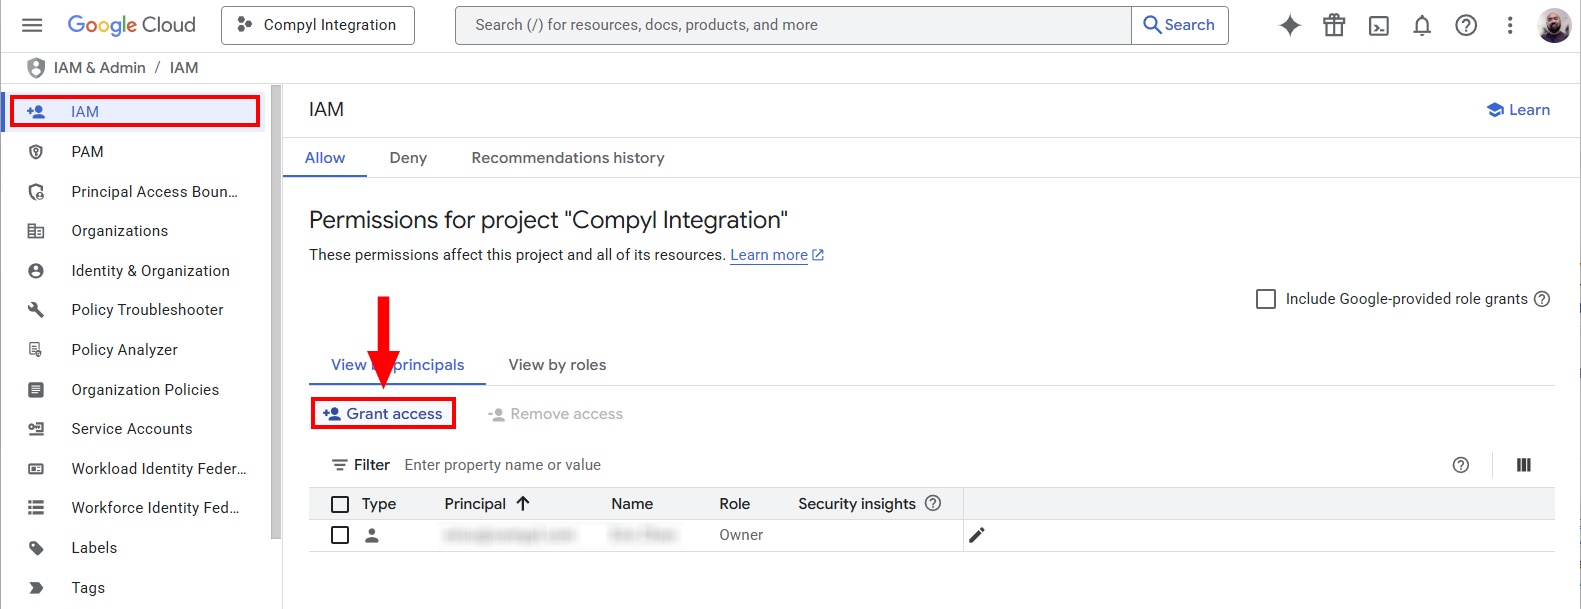
-
Enter in the email addresses of all principals you wish to add and grant them the necessary role(s):
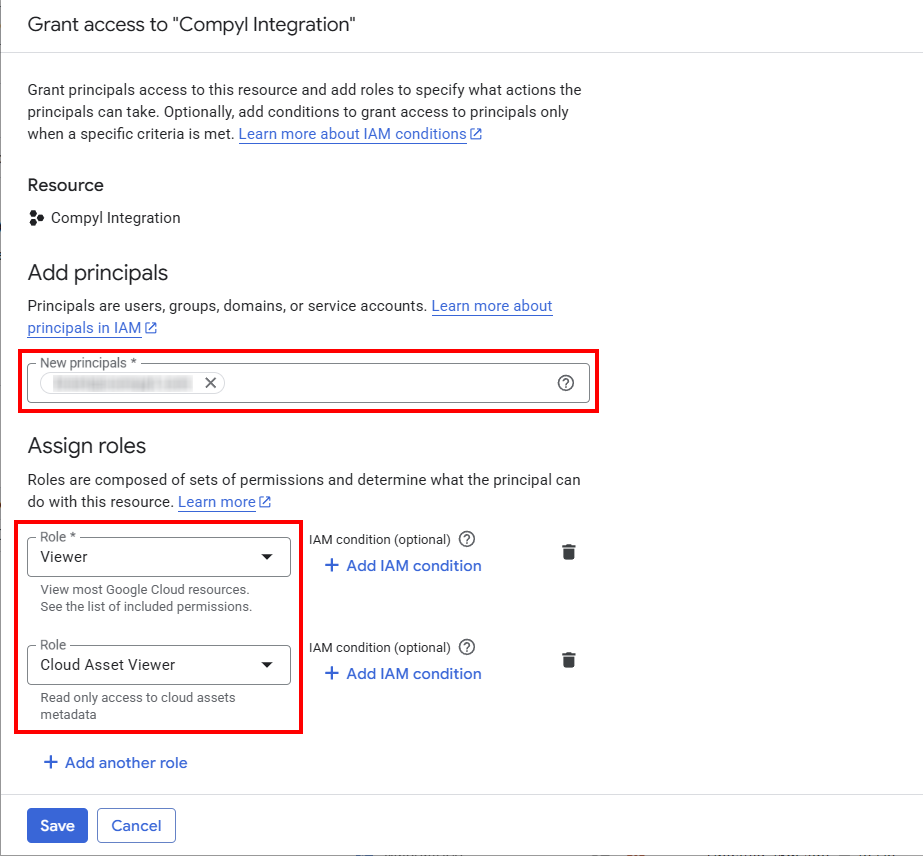
- Owner: Makes most aspects on the Google Cloud Platform accessible
- View + Cloud Asset Viewer: The minimum for the Compyl integration.
-
Click Save and you'll now see your new principal in the gridview.
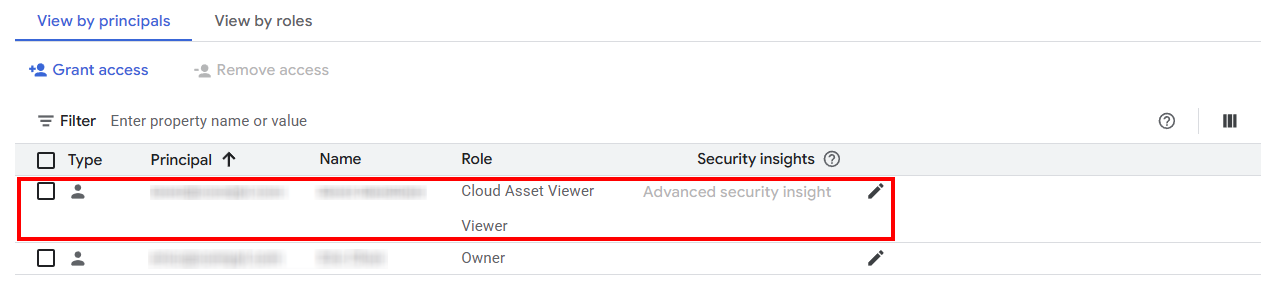
Create a service account
-
Open the Service accounts page.
-
Select a project we just created and added APIs for, or Create a new one.
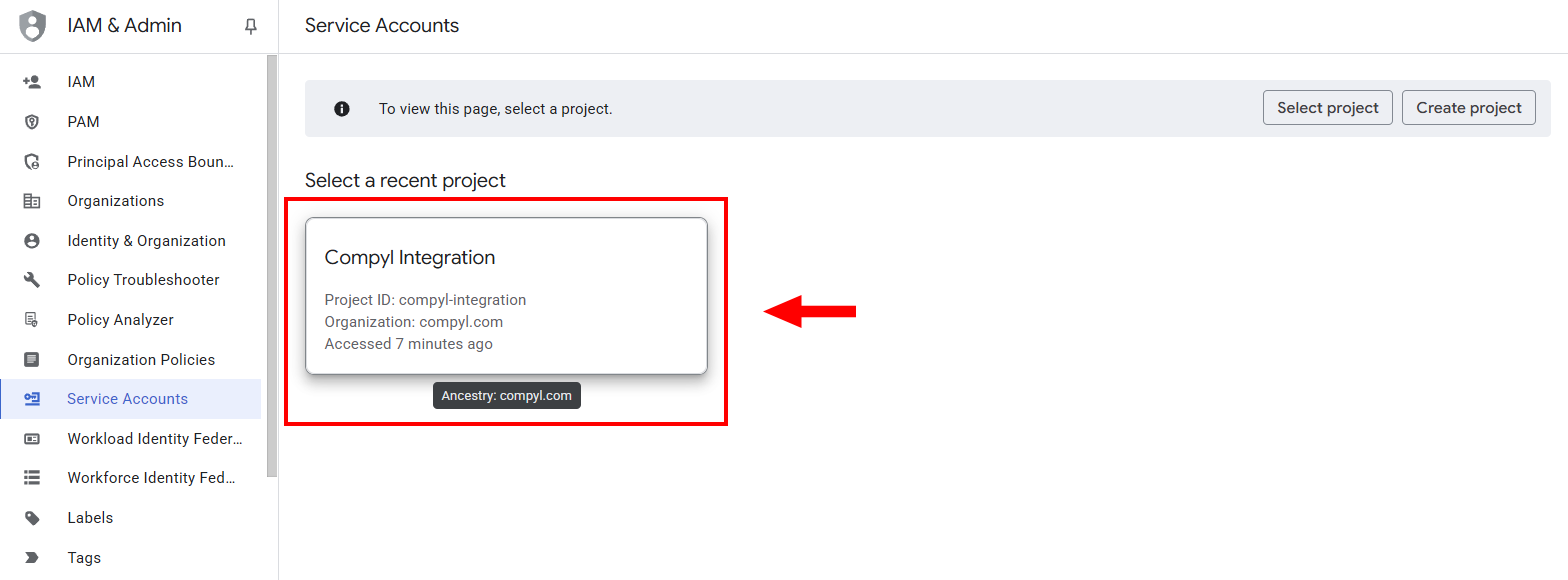
-
Click add Create service account.
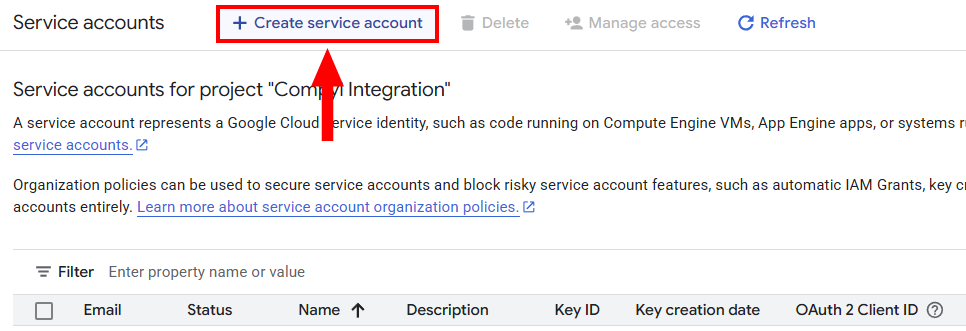
-
Under Service account details, type a name, ID, and description for the service account, then click Create and continue.
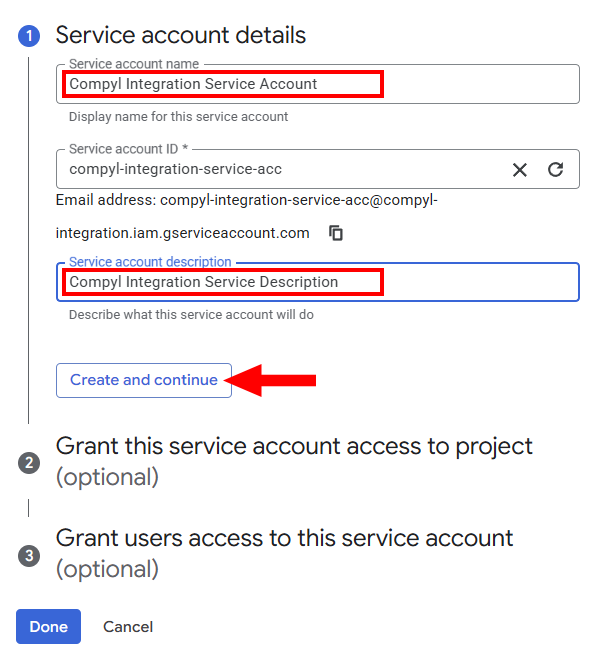
-
Click Create and continue.
-
You can repeat the steps for creating principal accounts as above by clicking on Grant this service account access to project.
-
Click Done.
Confirming Roles between Project and Service
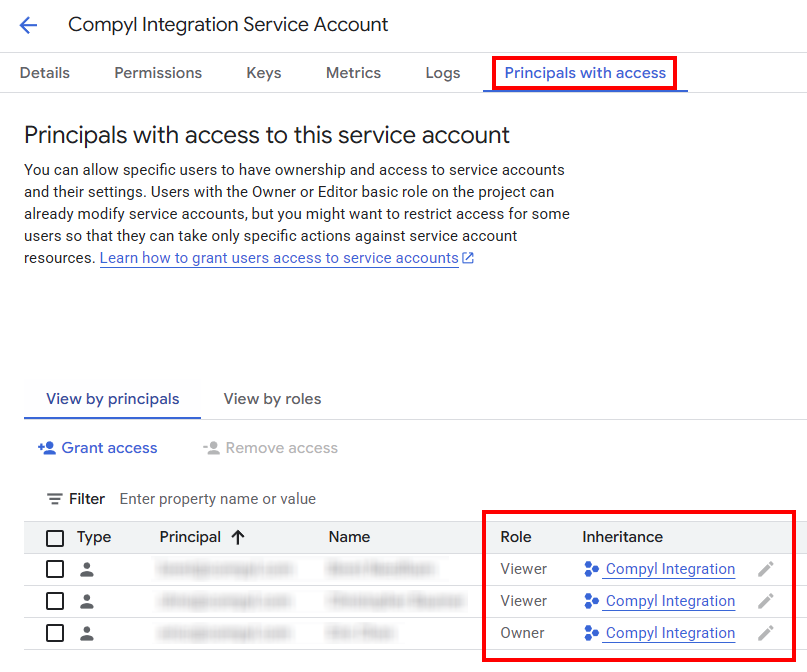
NoteEach account will need principal access in both the Project and the Service. Ensure the user assigned to the service account has the same roles as the same user set up on the project, either via inheritance or by manually adjusting the roles on both the project and service account.
If an account is granted access only within the Service, it will not reflect in the Project and will not work properly.
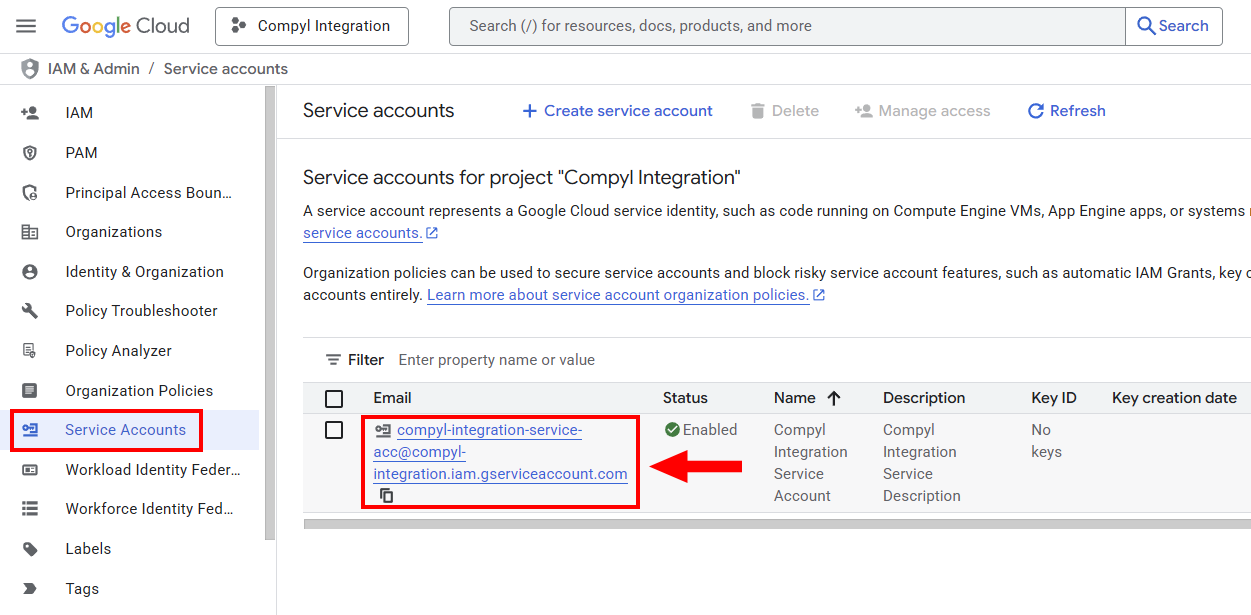
To ensure each principal account as the same Roles, go to Service Accounts in the left-hand menu and clicking on the Service itself.
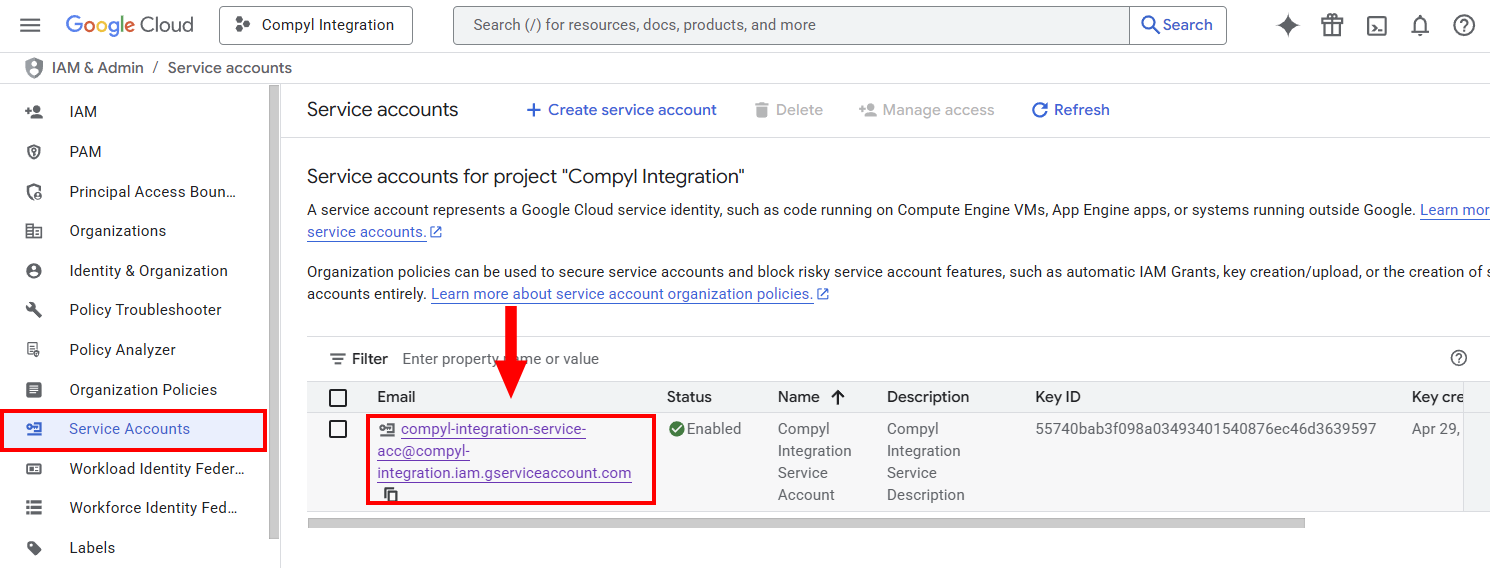
Then click on Principals with access. If the Inheritance column is blank, that Principal will need to be granted access within the Project as outlined above.
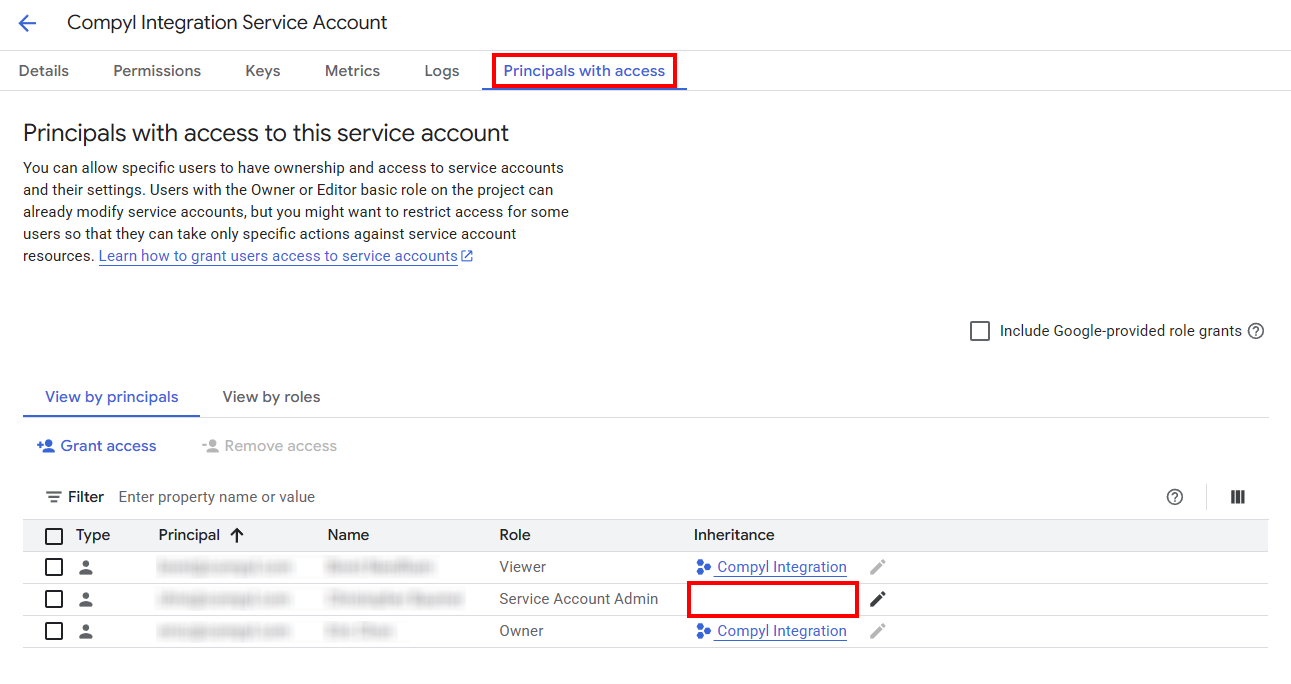
If set up correctly, then the Roles shown in IAM > View by principals and in Service Accounts > Service will align.
Creating a service account key
-
On the main screen, click on Service Accounts and then choosing the email.
-
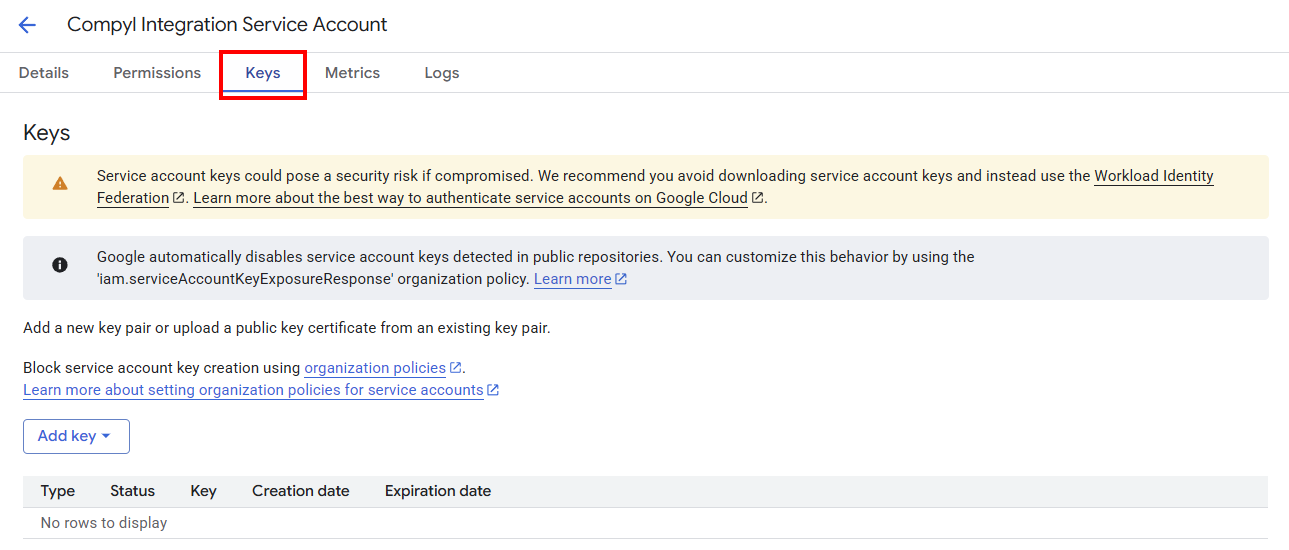
Click the Keys tab.
-
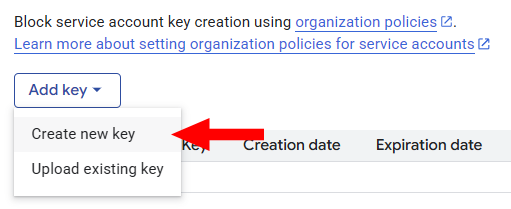
In the Add key drop-down list, select Create new key.
-
Leave it on JSON unless you have a specific requirements using the P12 format and click Create.
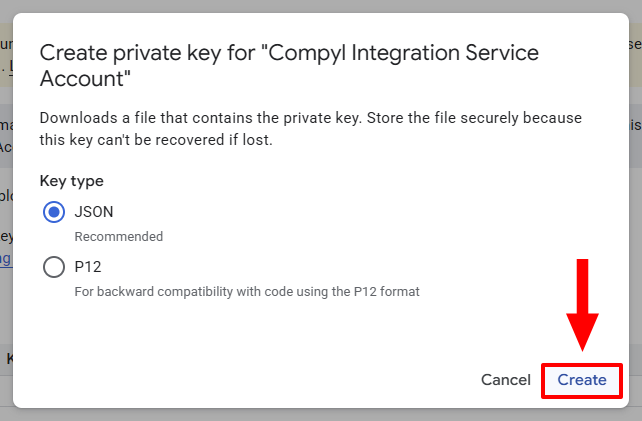
Your new public/private key pair is generated and downloaded to your machine.
Warning- This serves as the only copy of the private key. If you lose this key pair, you will need to generate a new one. Please store this securely.
- The private key begins with
-----BEGIN PRIVATE KEY-----and ends with-----END PRIVATE KEY-----. Do not alter or change this as it is required. Be sure to include these sections when copying/pasting the key.
You can return to the API Console at any time to view the email address, public key fingerprints, and other information, or to generate additional public/private key pairs. For more details about service account credentials in the API Console, see Service accounts documentation.
Take note of the service account's email address and store the service account's private key file in a location accessible to your application. You will need these credentials to configure this integration in Compyl.
Service Account Authority
If you have a Google Workspace account, an administrator of the organization can authorize an application to access user data on behalf of users in the Google Workspace domain. For example, an application that uses the Google Calendar API to add events to the calendars of all users in a Google Workspace domain would use a service account to access the Google Calendar API on behalf of users. Authorizing a service account to access data on behalf of users in a domain is sometimes referred to as "delegating domain-wide authority" to a service account.
Delegating domain-wide authority
To delegate domain-wide authority to a service account, a super administrator of the Google Workspace domain must complete the following steps:
-
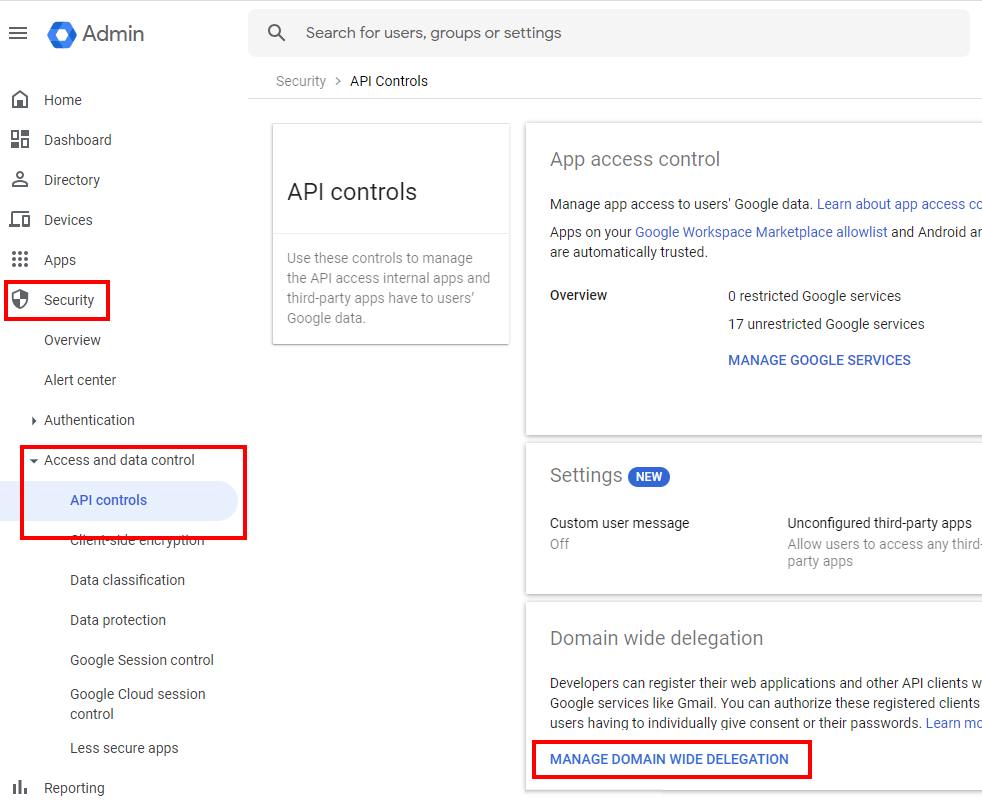
From your Google Workspace domain's Admin console, go to Main menu > Security > Access and data control > API Controls.
-
In the Domain wide delegation pane, select Manage Domain Wide Delegation.
-
Click Add new.
-
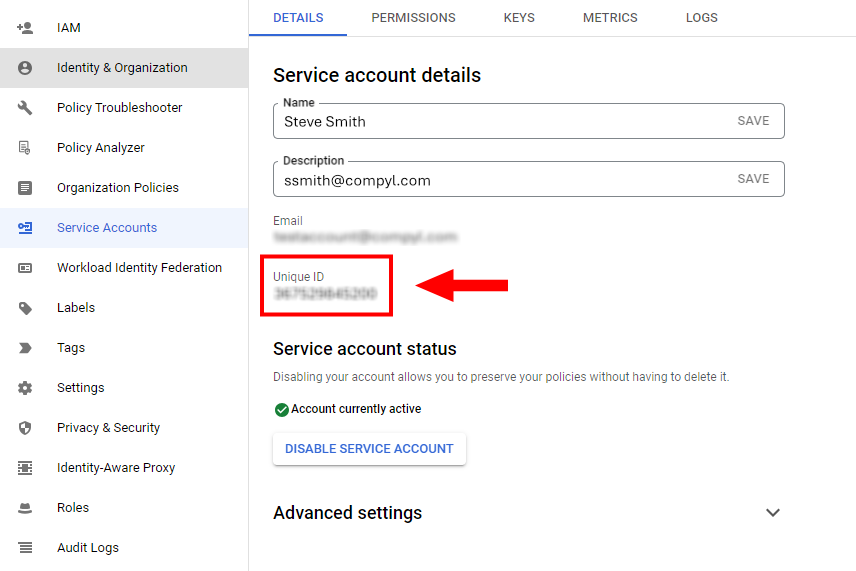
In the Client ID field, enter the service account's Client ID. You can find your service account's client ID in the Service accounts page.
-
In the OAuth scopes (comma-delimited) field, enter the list of scopes that your application should be granted access to. Please add all of the following scopes from the table below.
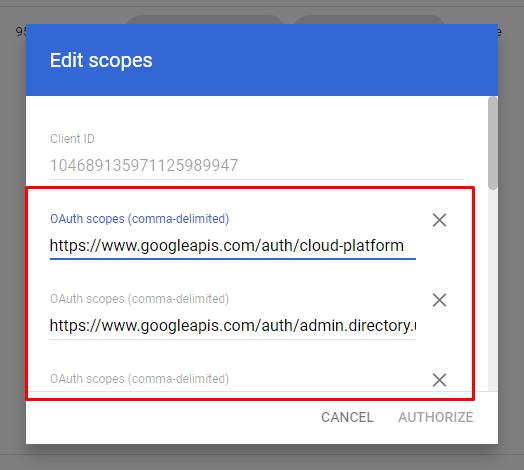
-
Click Authorize.
Your application now has the authority to make API calls as users in your domain (to "impersonate" users). When you prepare to make authorized API calls, you specify the user to impersonate.
Add Configuration
-
Navigate to the Integrations tab using the left-hand menu, and select Google Cloud Platform
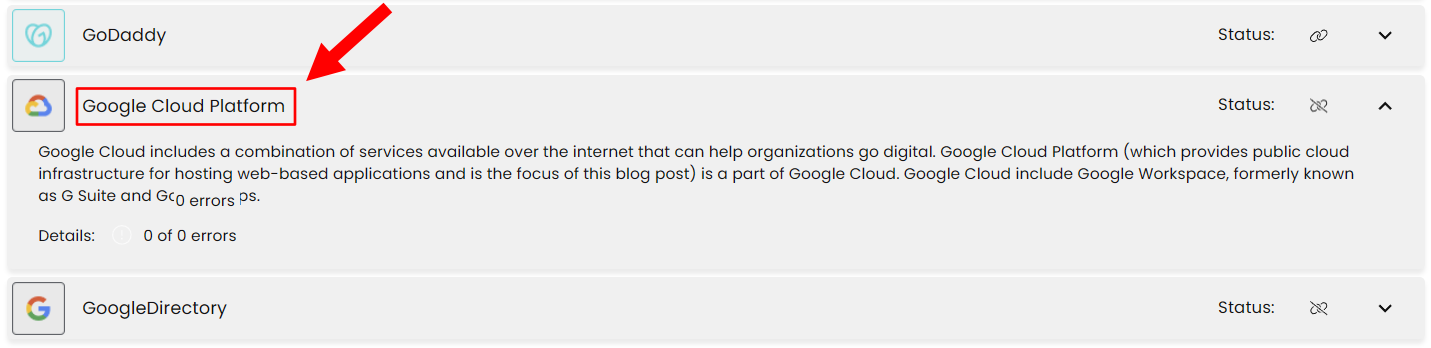
-
Click the Add Configuration button and fill in the details below:

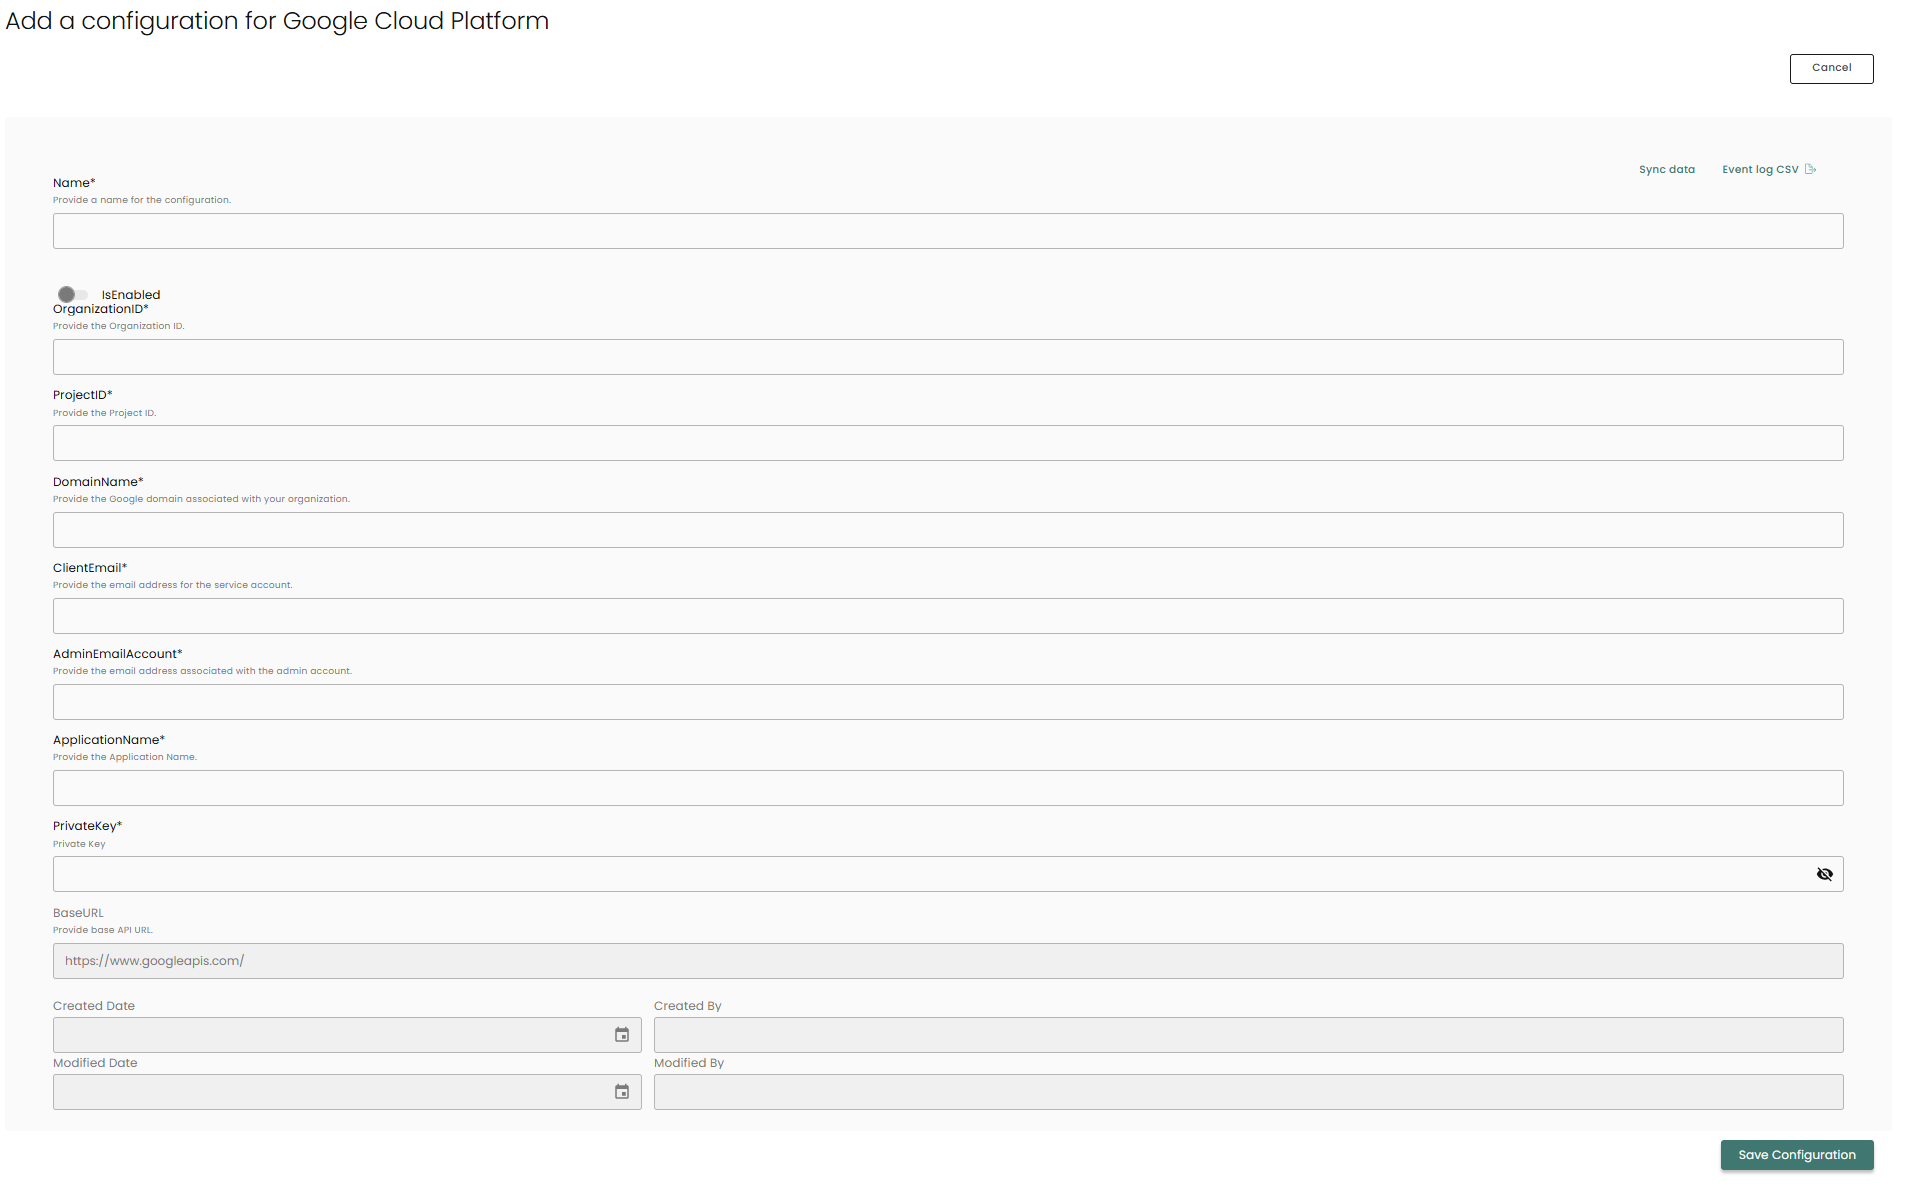
is Enabled: Toggle button to ensure data is populated into Compyl.
Name: Please enter a name for your integration configuration.
Organization ID: The Organization ID, which can be found on the Organization details page .
Project ID: The Project ID, which can be found on the Service accounts page.
Domain Name: The Google Domain associated with your organization (ex. compyl.com).
Client Email This is the same Client ID used in Step 4 of the above instructions on Delegating domain-wide authority to the service account. You can find your service account's Client ID in the Service accounts page.
Admin Email Account: Any email account that has admin access.
Application Name: Name of the application you are integrating.
Private Key: This is generated above in Step 4 of Create a Service Account Key.
Once you have completed filling out the form click Save Configuration.
NoteTo check if the integration is connected, navigate to the Integrations page in Compyl. If the Status icon shows an unbroken link in the right-hand corner, your integration is properly connected.

This integration syncs daily.
To query the data from the integration, refer to the Query Builder article.
Updated 2 months ago