
Azure Integration
Integrating with Azure will allows users run a variety of queries against their Azure environment in line with their security controls and priorities including CIS benchmarks
PrerequisiteThe Client ID and Client Secret Key will need to identified within the Azure portal. Additionally, Microsoft Graph permissions must be granted.
Locate the Client ID and Granting Permissions
-
Log in to the Azure portal.
-
Navigate to the Identity → App Registrations.
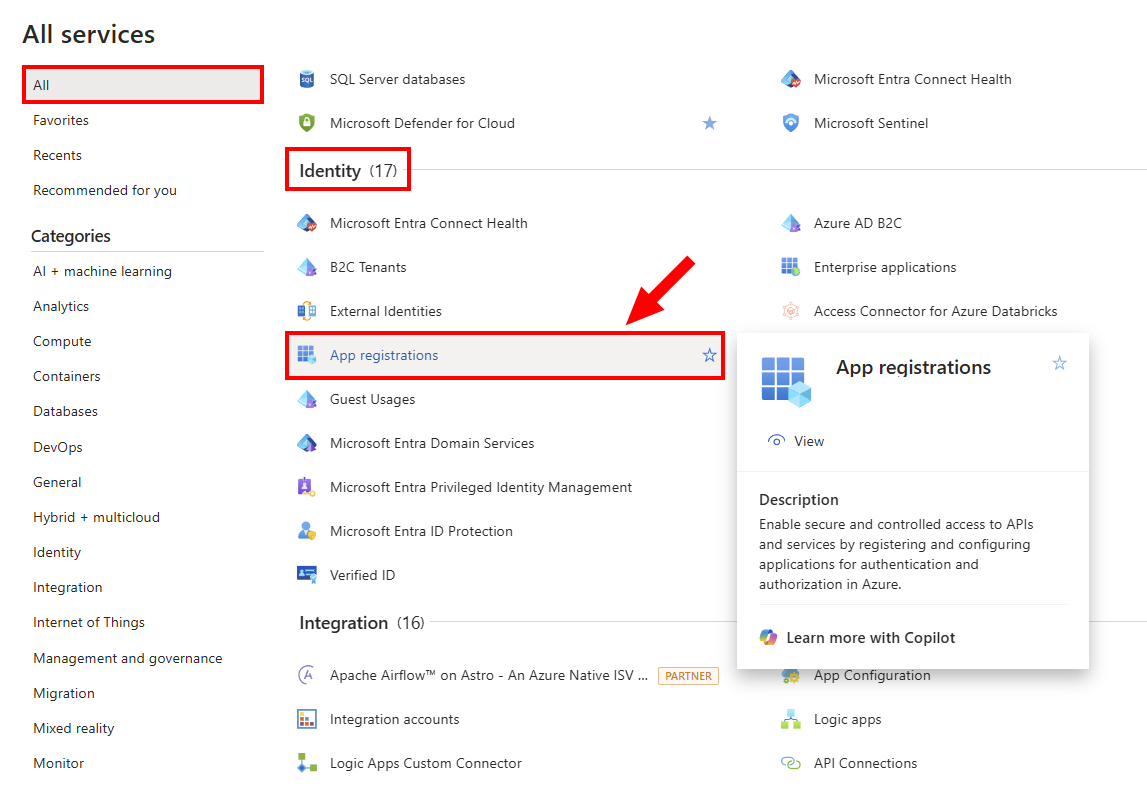
-
You can choose to create a new App Registration for this integration, or use a pre-existing App Registration. To create a new App Registration:
-
Select New Registration.
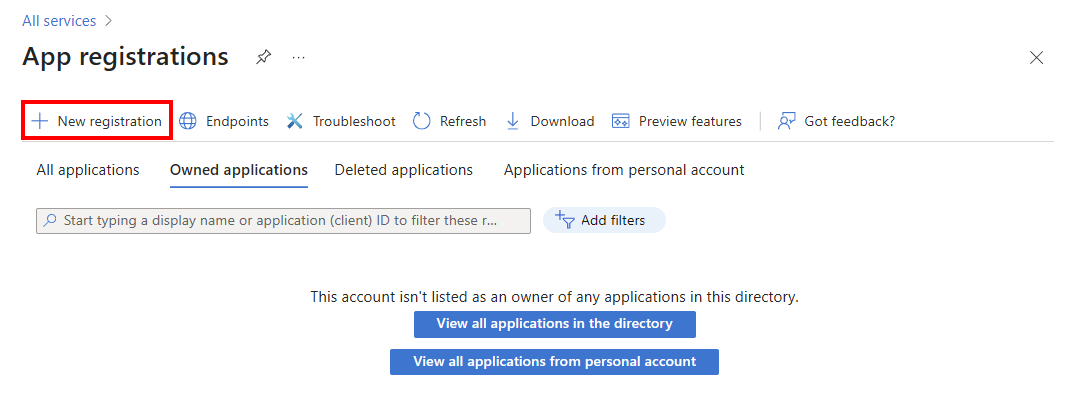
-
Name the App and select Multiple Entra ID tenants in the drop-down menu as the support type, which will allow Compyl to make requests to this App Registration. Make sure to select Allow all tenants as well.
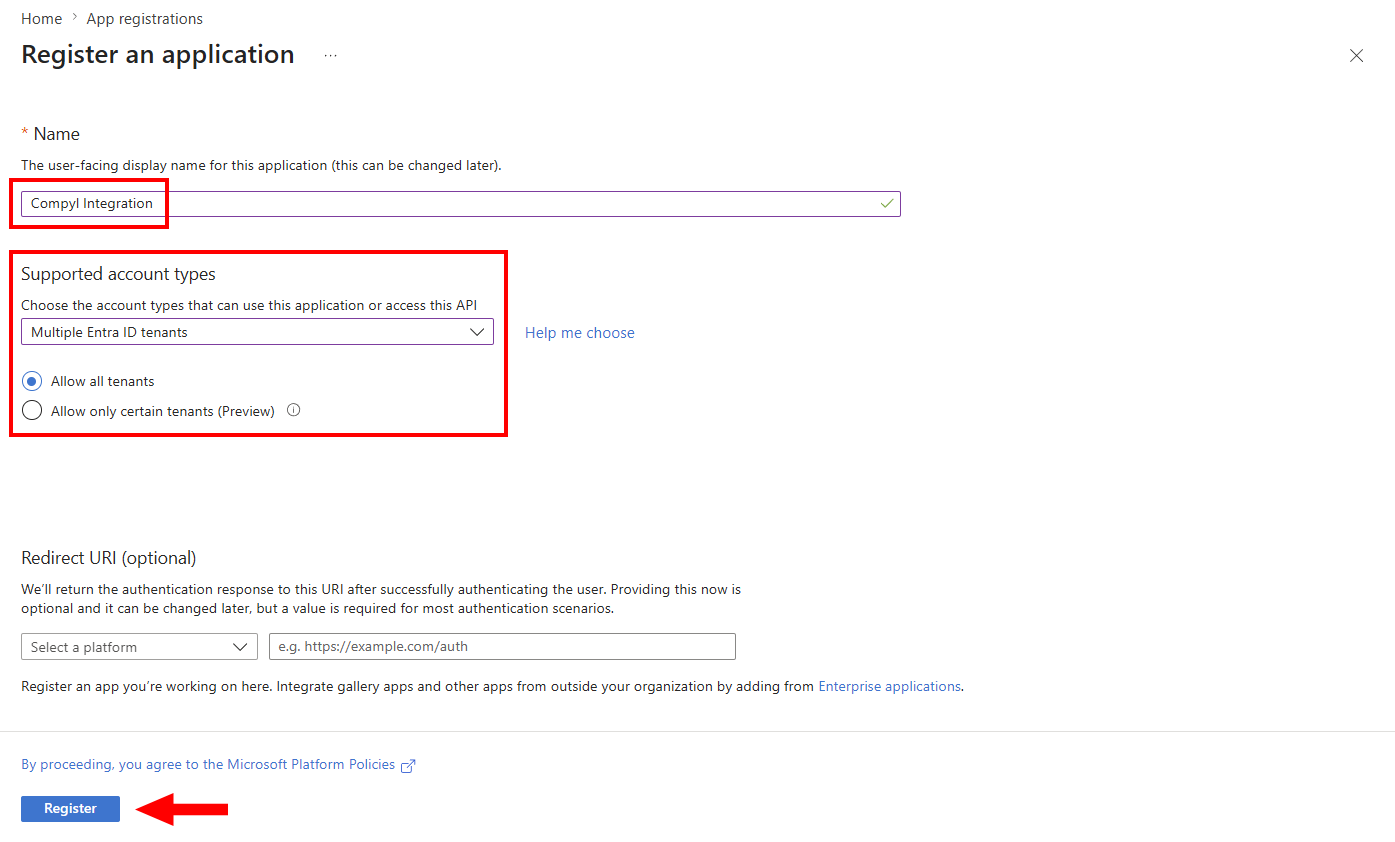
Why Multi-Tenant?Compyl is hosted in Azure and is making a call to your Azure service. This Integration must be able to authenticate users from multiple directories (tenants) - ours and yours. Single-tenant only allows for either/or.
- Next, click Register.
-
-
The next page will show your App's essential information, including the Client ID (Application ID) and the Tenant ID (Director ID). These are needed for the configuration so copy them to a safe location for use later on.
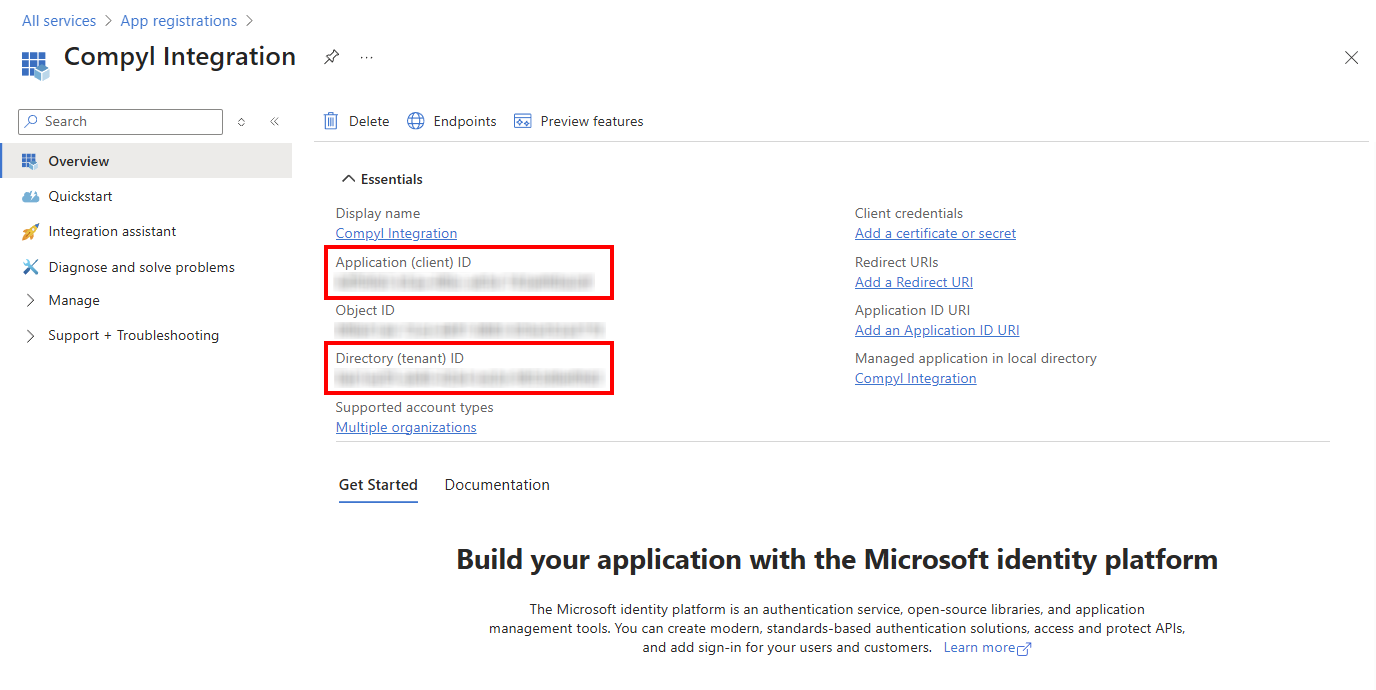
-
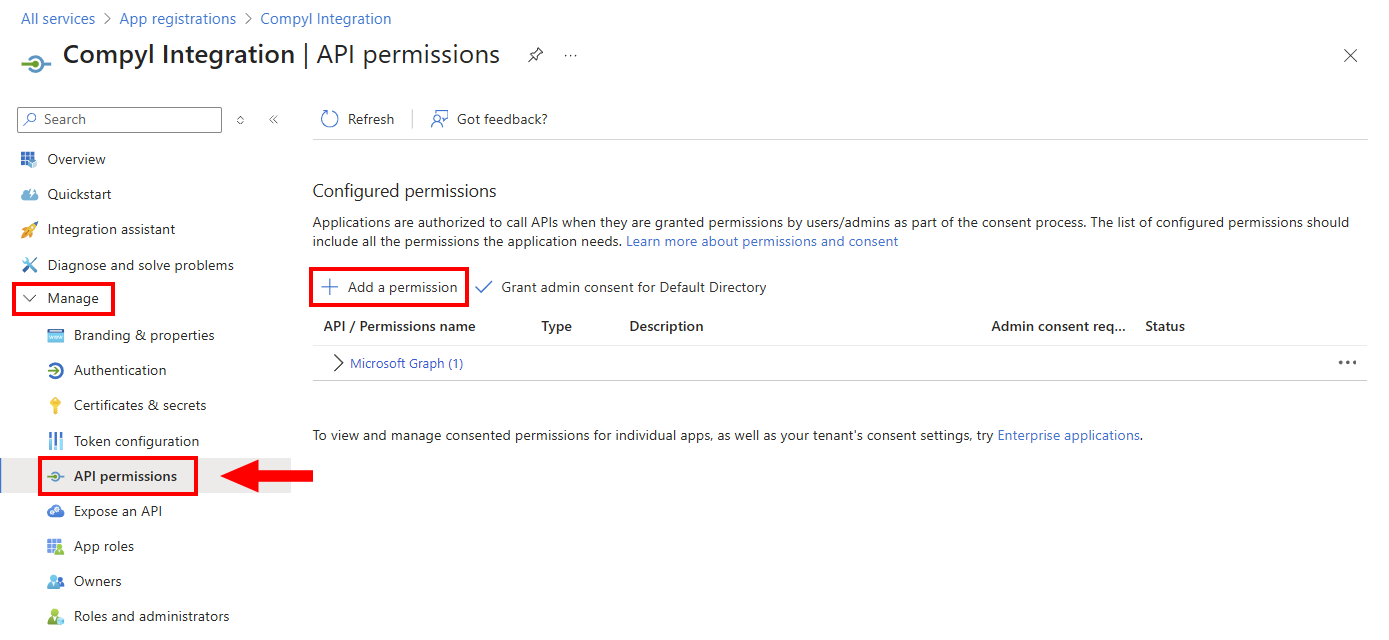
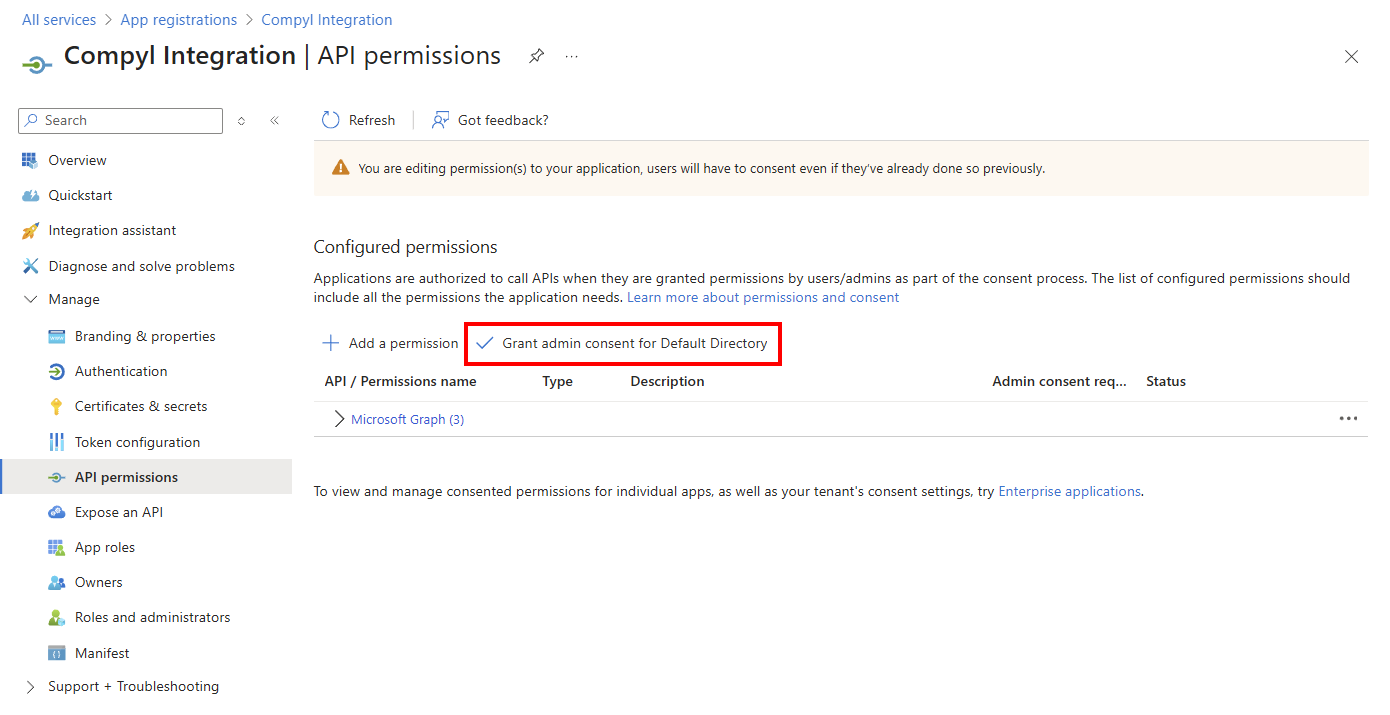
Under Manage on the left sidebar, go to API Permissions and then select Add a permission.
-
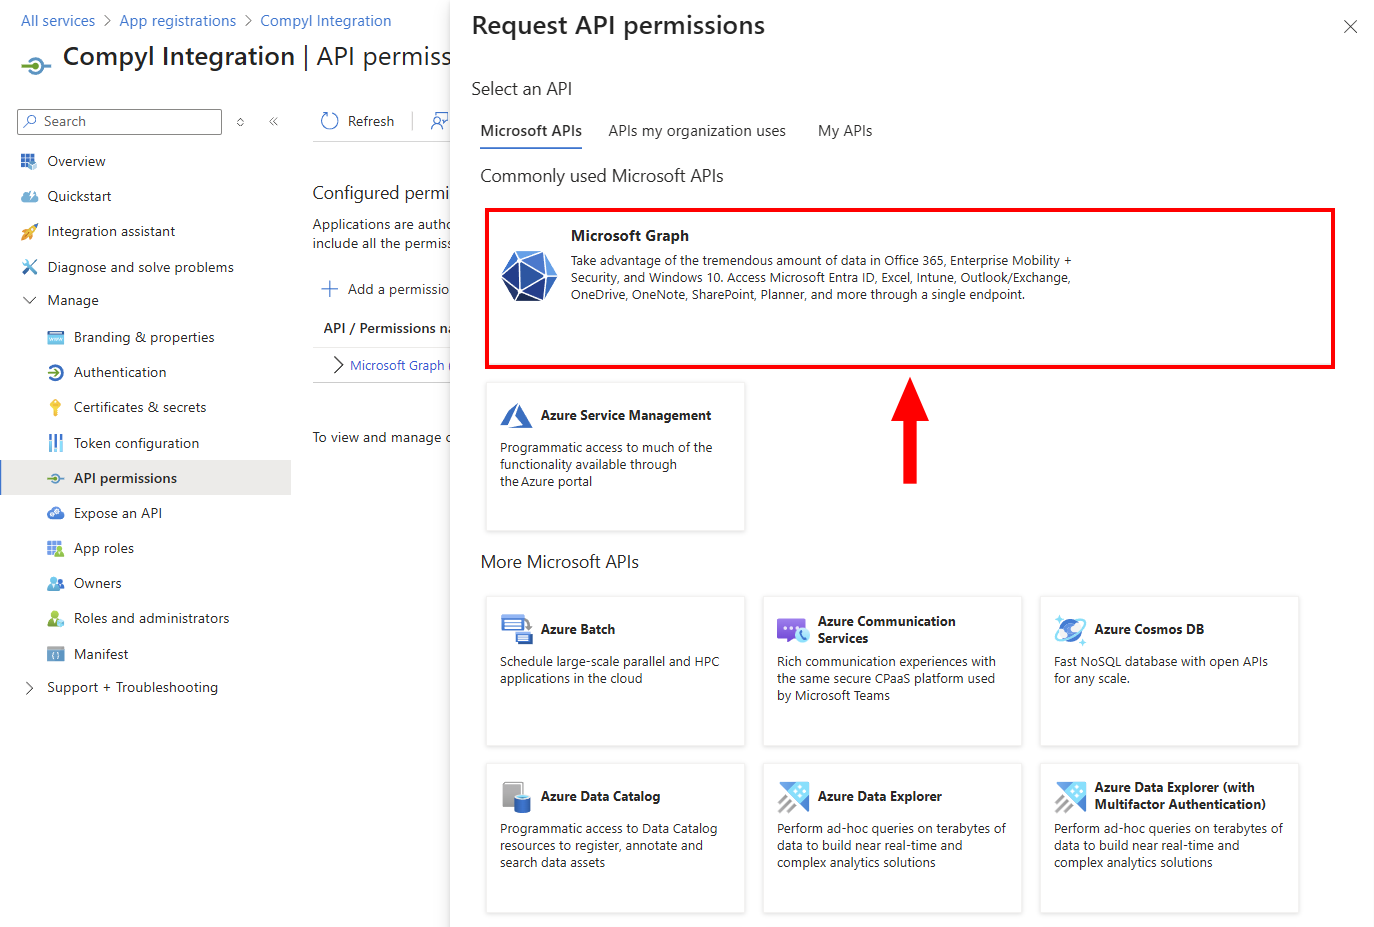
Select Microsoft Graph.
-
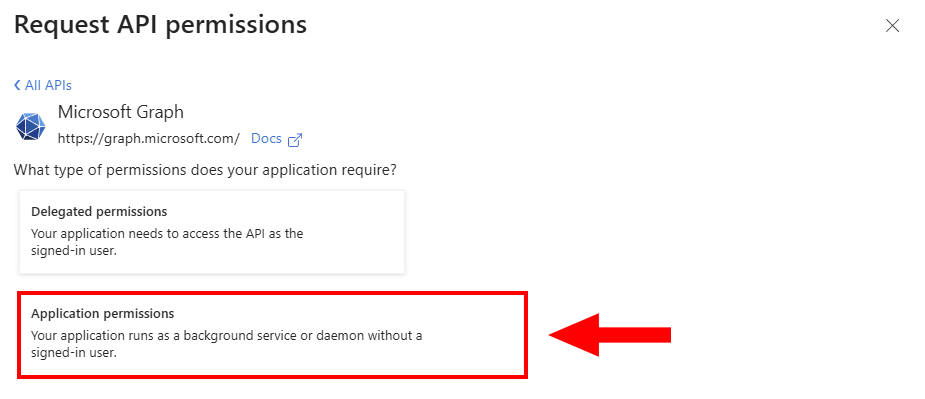
Select Application Permissions.
-
Select the following Permissions and then click Add Permissions:
Permissions AuditLog.Read.All ChannelMember.Read.All DeviceManagementApps.Read.All DeviceManagementConfiguration.Read.All DeviceManagementManagedDevices.Read.All DeviceManagementRBAC.Read.All DeviceManagementServiceConfig.Read.All Directory.Read.All Group.Read.All GroupMember.Read.All Policy.Read.All RoleManagement.Read.All SecurityEvents.Read.All Team.ReadBasic.All TeamMembers.Read.All TeamSetttings.Read.All User.Read.All 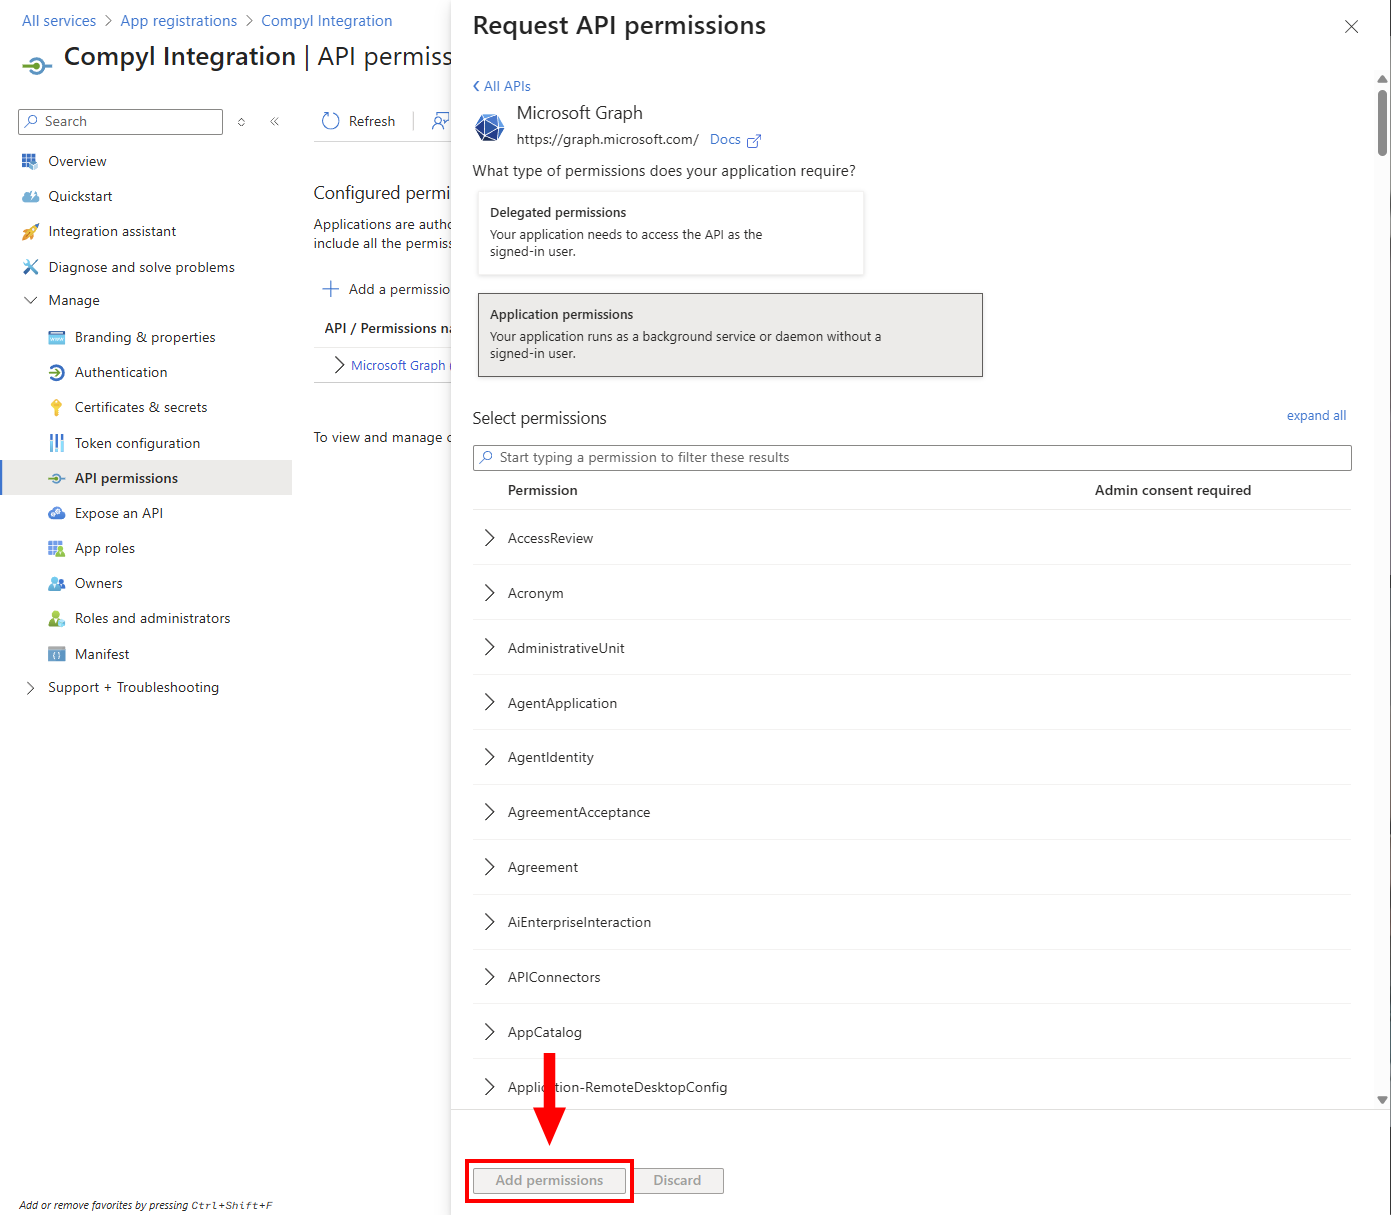
-
The Permissions Panel will close and then click Grant admin consent for … and the permissions will be granted
Create the Secret Key
-
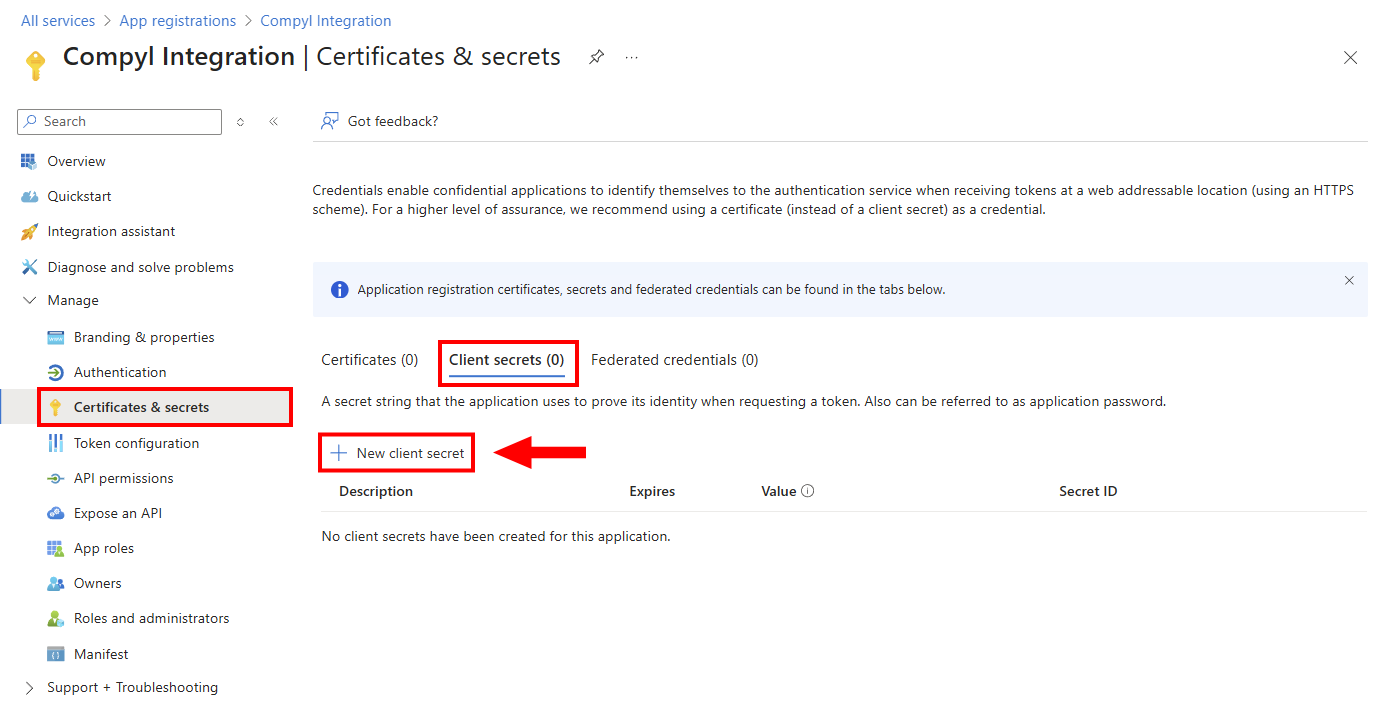
Navigate to Certificates & Secrets, select Client secrets, and then click on + New client secret.
-
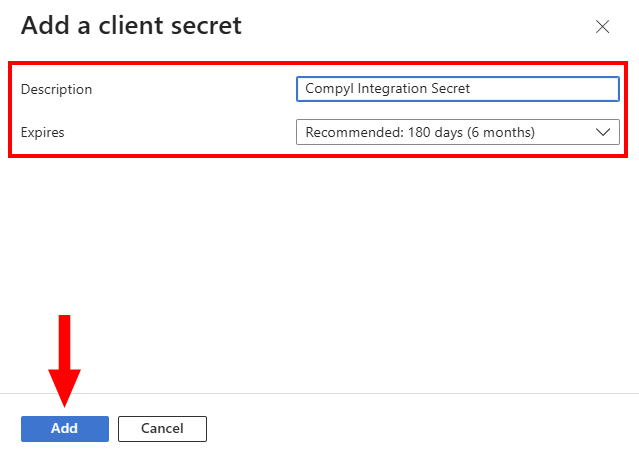
Add a description and set an expiration date. You will need to update the client secret in Compyl after it expires.
-
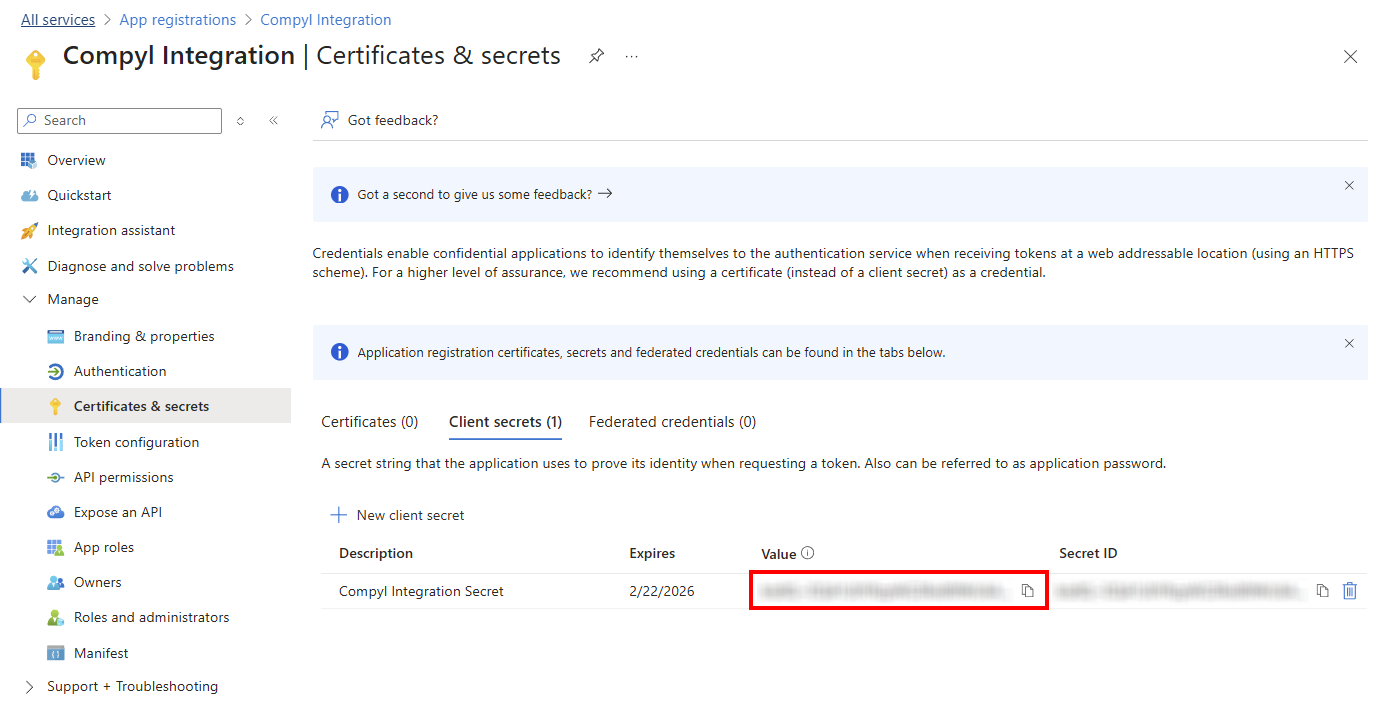
After saving the Client Secret, copy the Value to a secure location.
Setting a Subscription ID
Compyl Supports integrating with multiple Subscriptions. You will have to create multiple tiles, one for each Subscription. The rest of the details on the integration configuration tile can be the same (e.g. Tenant ID, Client ID, and Client Secret).
To provision the Integration for read access on a subscription, you will need to follow these steps:
-
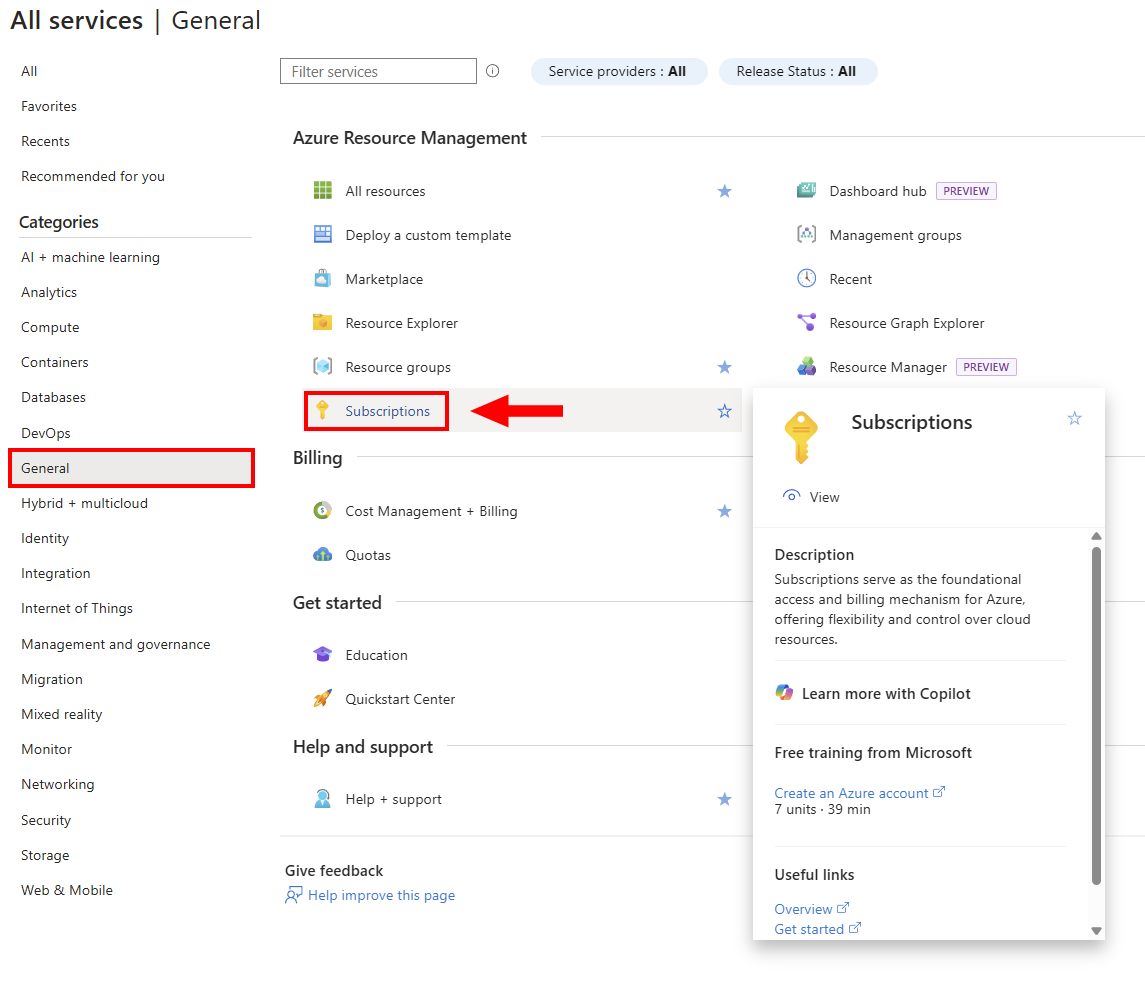
In the Azure portal navigate General → Subscriptions . Then select your current subscription from the list.
-
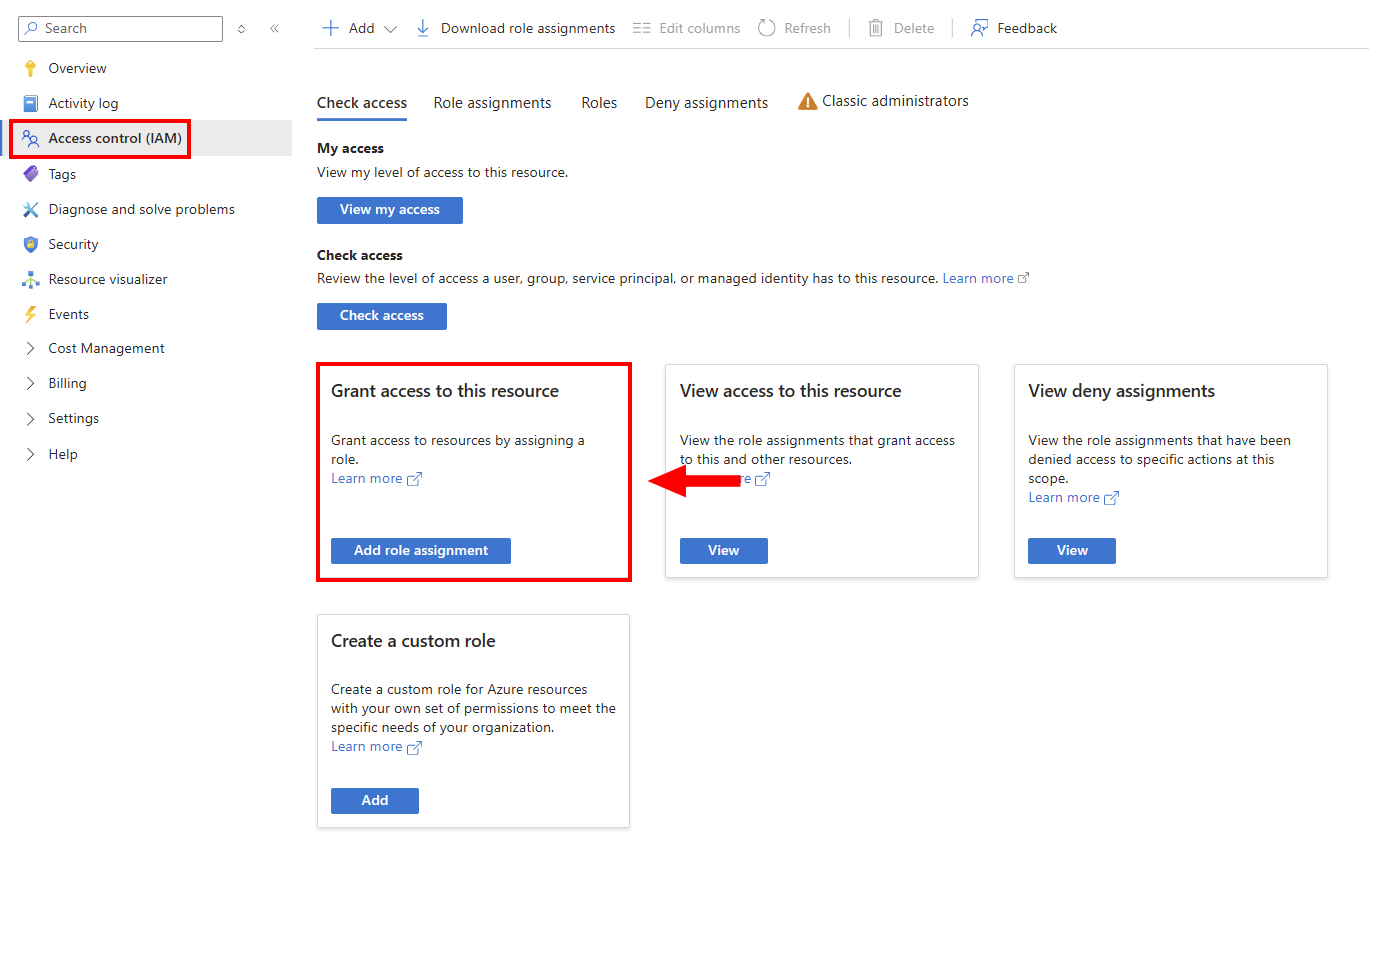
On the next page, select Access control (IAM) and click on Add role assignment.
-
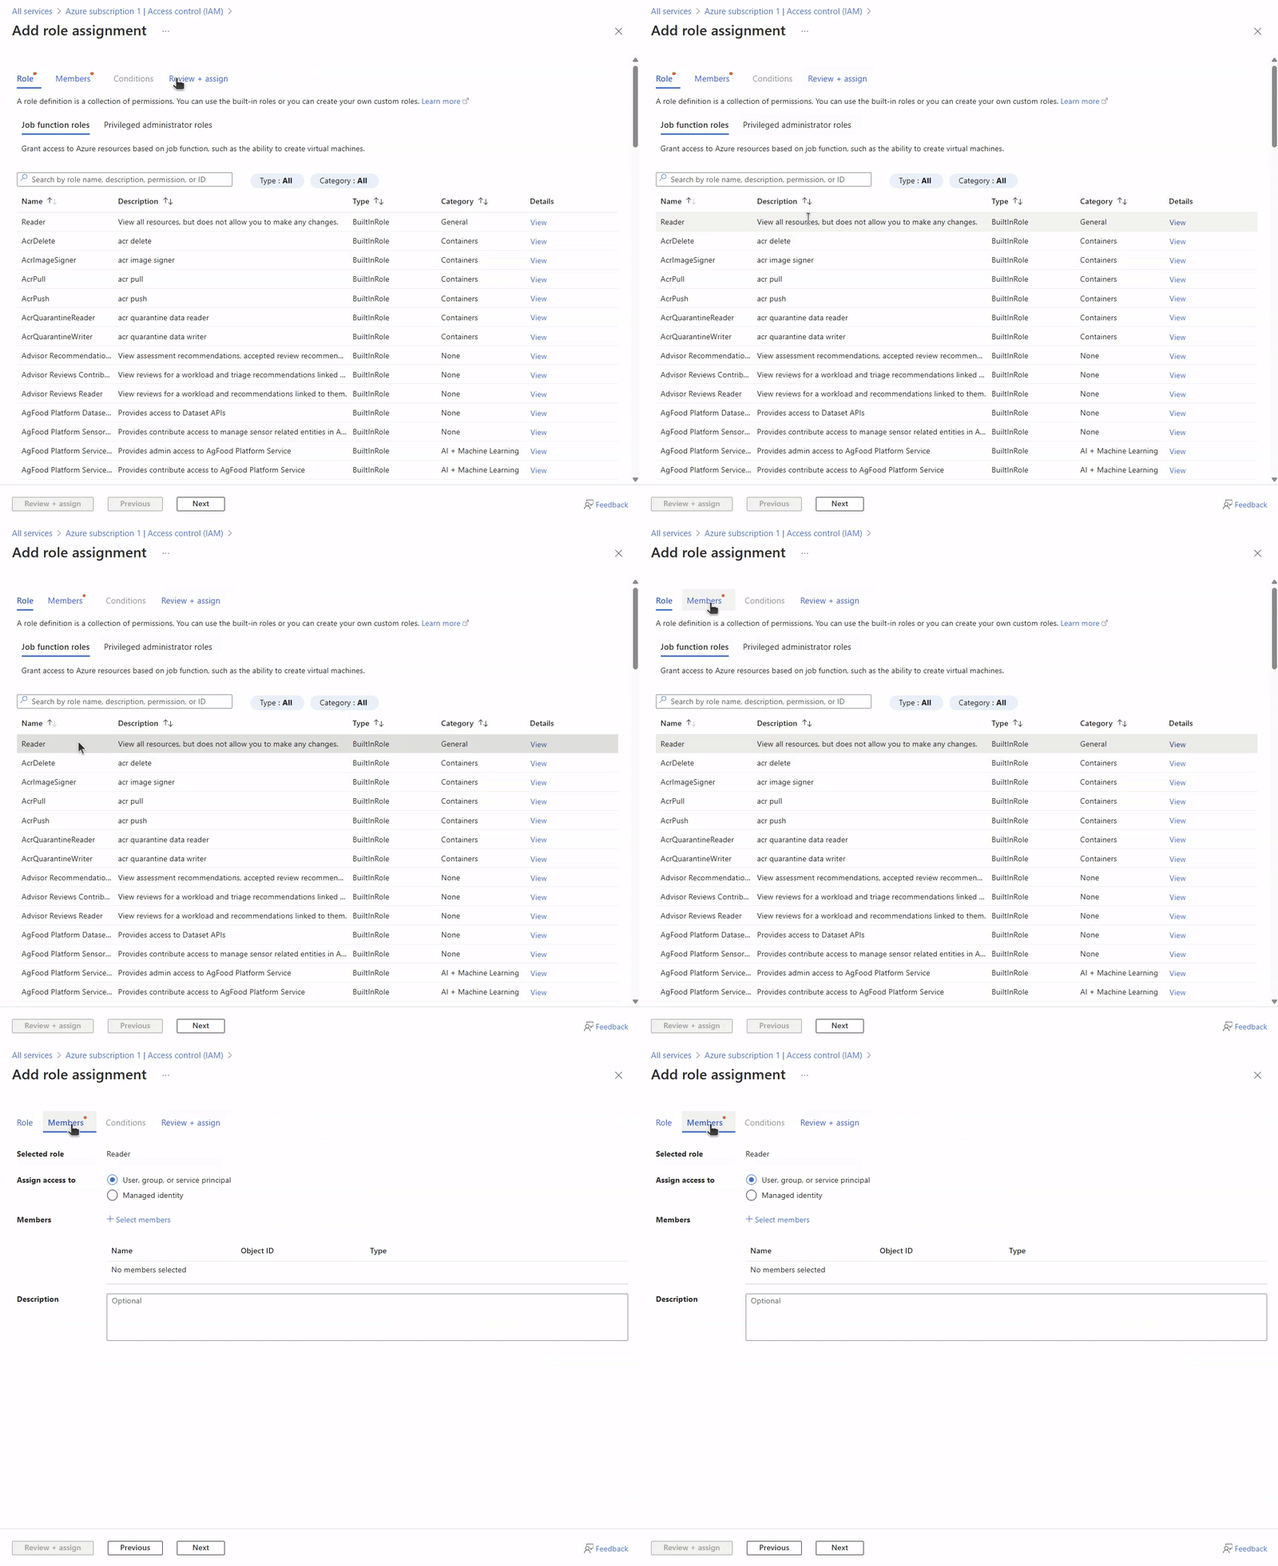
Click on the Reader row and then click on Members above.
-
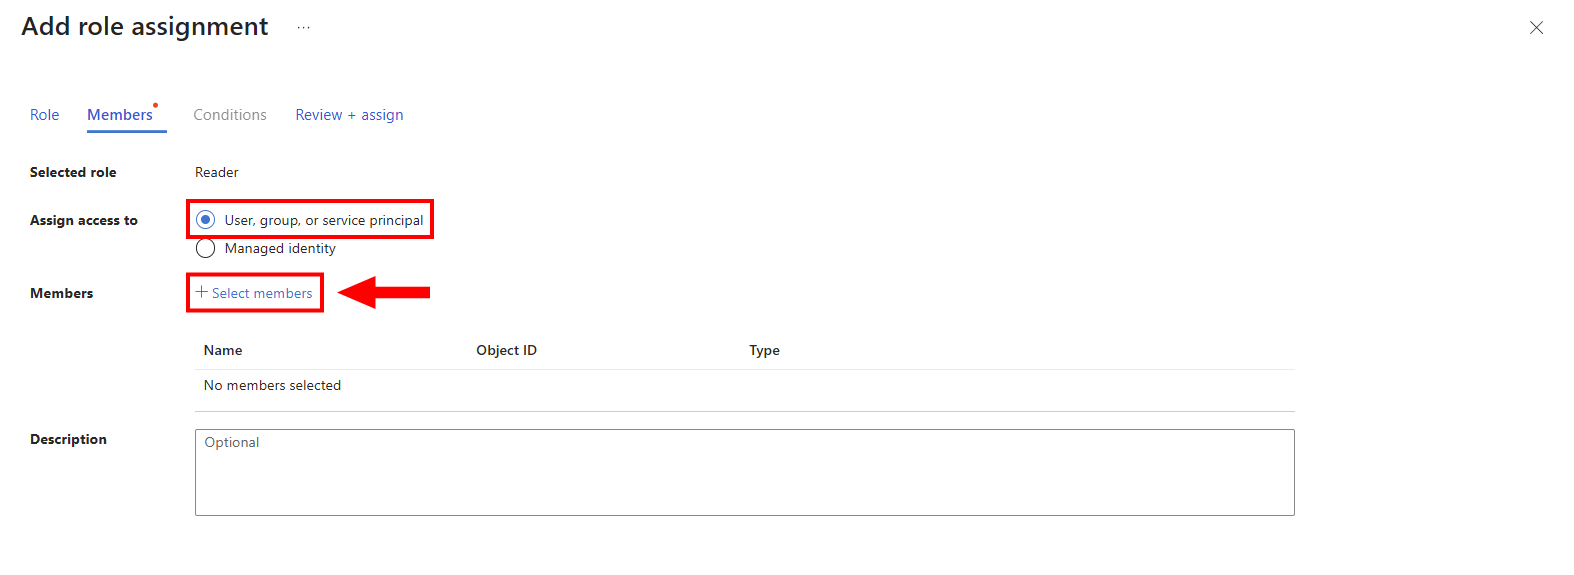
Select User, group, or service principal and then click on + Select members
-
On the right hand side of the screen, search for the App Registration we created previously and select it.
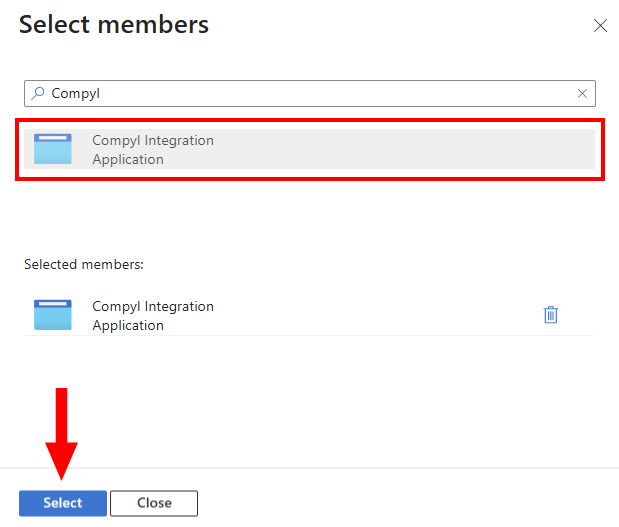
-
Review and Assign the Selection
-
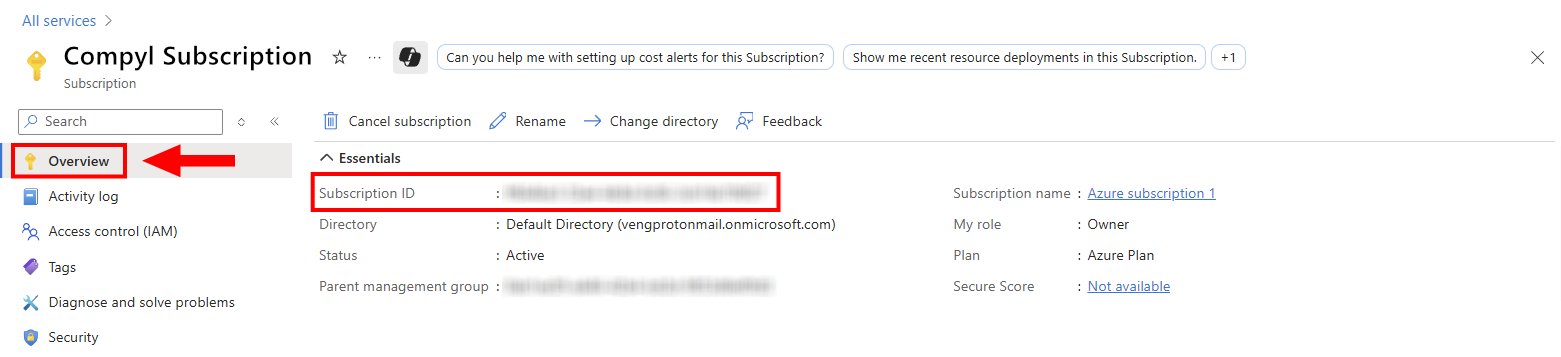
Select Overview and find the Subscription ID. Copy this for use in the Compyl Configuration.
Microsoft Defender for Endpoint
Microsoft Defender for Endpoint (MDE) extends the existing Azure integration to pull endpoint security data directly from the Microsoft Defender TVM (Threat and Vulnerability Management) APIs. This gives Compyl visibility into every onboarded device, installed software, known CVEs, exposure mappings, and security recommendations across your tenant.
PrerequisiteYou must already have a working Azure integration in Compyl with a registered App and a valid Client Secret. The Defender for Endpoint data syncs under the same Azure configuration tile -- no separate integration is needed. If you have not set up the Azure integration yet, complete that first.
License RequirementYour Azure tenant must have Microsoft Defender for Endpoint Plan 2 (or Microsoft Defender Vulnerability Management) licensed. Without Plan 2, the vulnerability and recommendation endpoints will return a 403 Forbidden error.
Grant Defender for Endpoint Permissions
Defender for Endpoint uses its own set of API permissions separate from Microsoft Graph. These must be added to the same App Registration your Azure integration already uses.
-
Log in to the Azure portal .
-
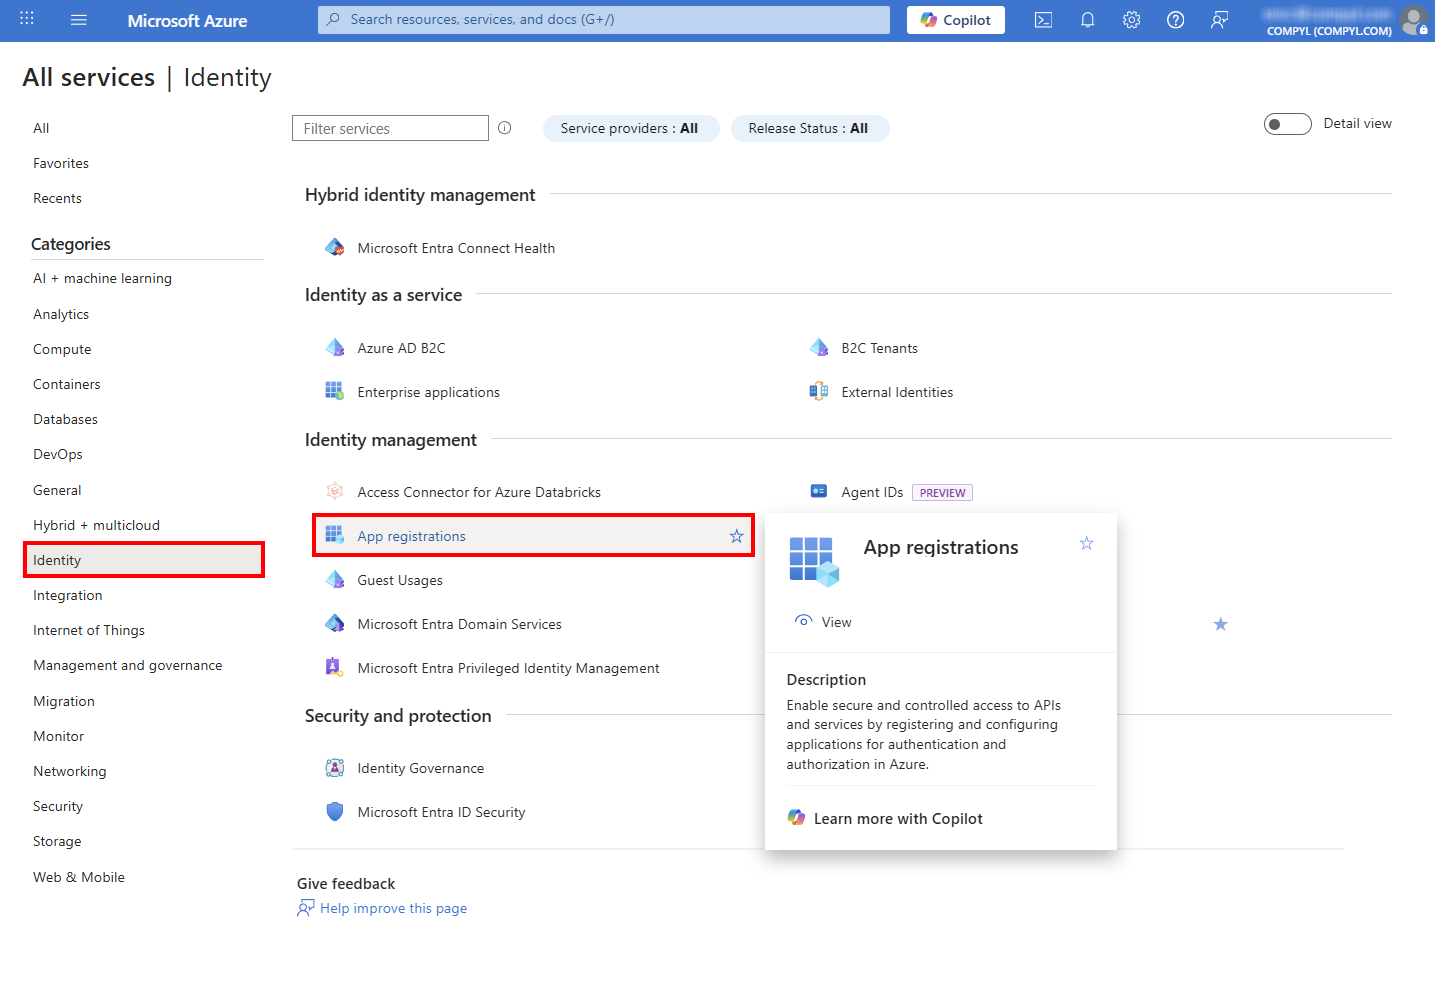
Navigate to Identity → App Registrations .
-
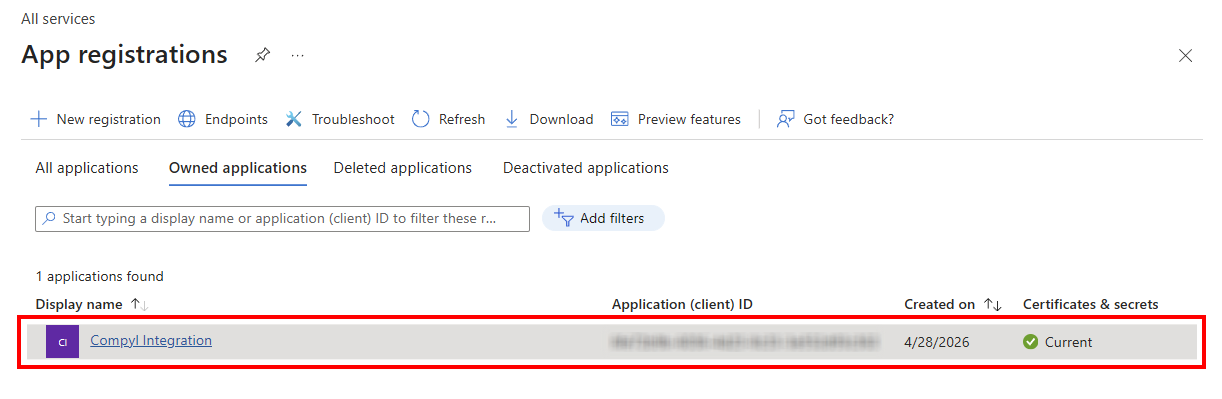
Select the App Registration used by your Compyl Azure integration.
-
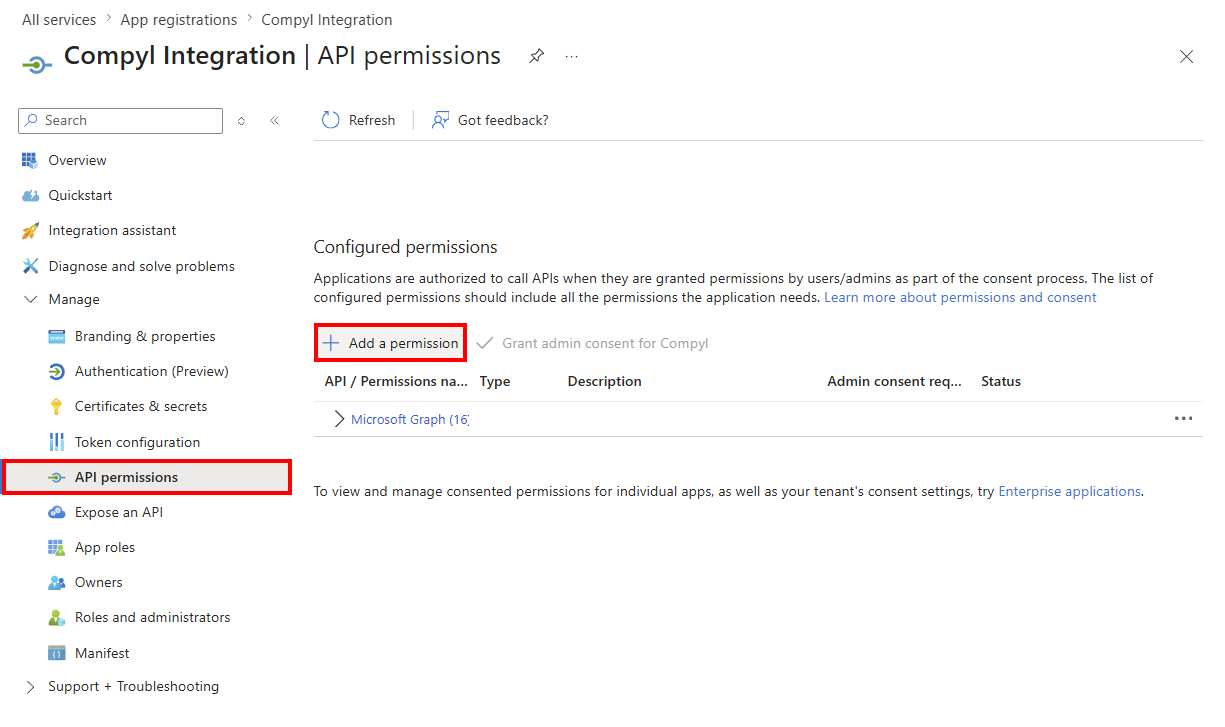
Then, under Manage on the left sidebar, go to API Permissions and then select + Add a permission.
-
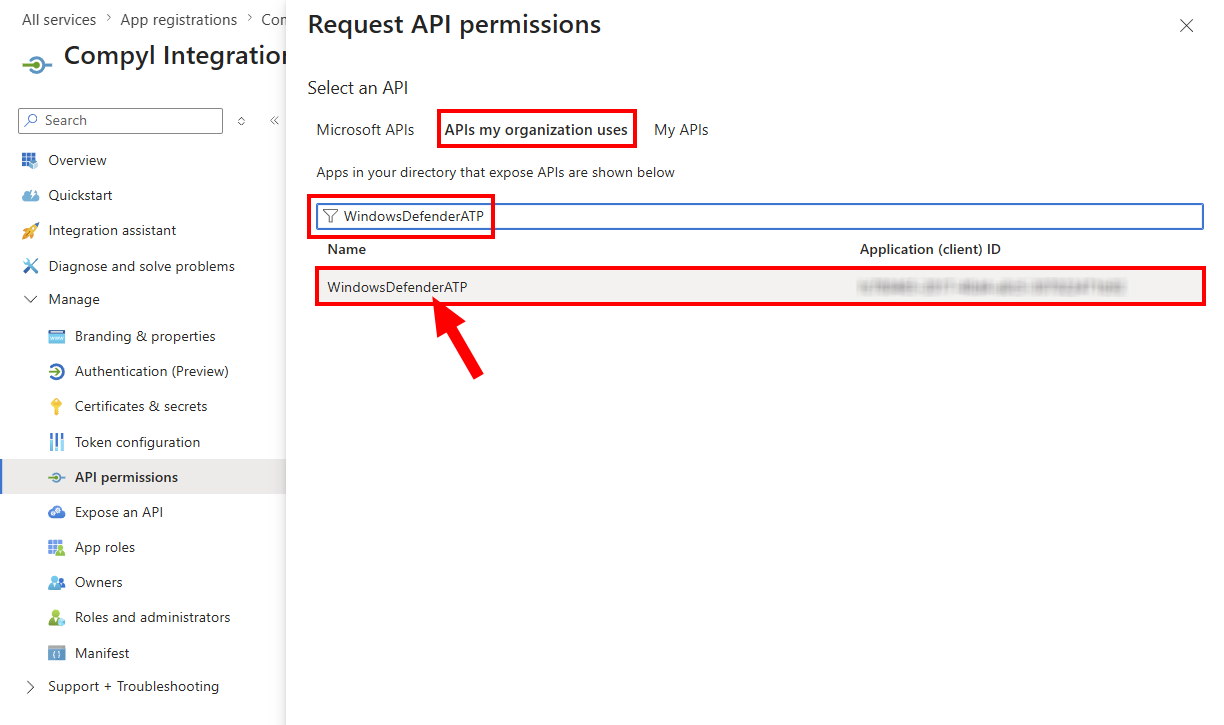
In the panel that opens, select the APIs my organization uses tab, search for WindowsDefenderATP, and select it from the results.
-
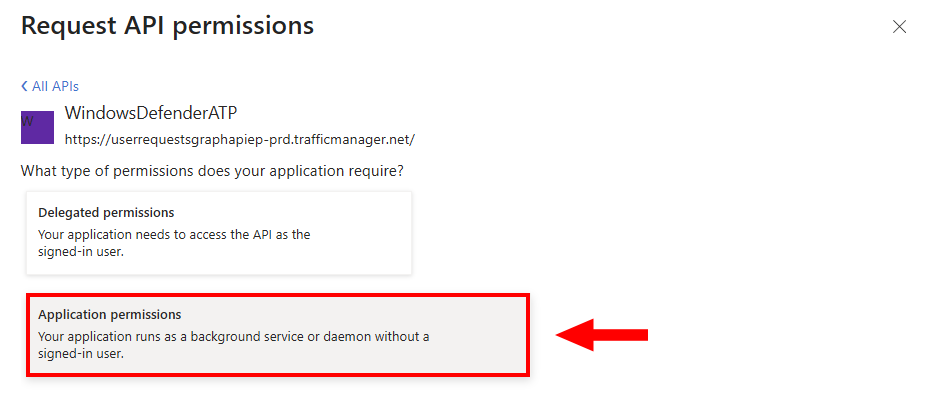
Select Application permissions.
-
Select the following permissions and then click Add permissions:
Permission What It Enables Machine.Read.All Read all onboarded machine/device data Software.Read.All Read the software inventory catalog and per-machine installed software Vulnerability.Read.All Read the CVE/vulnerability catalog and machine-software-vulnerability exposures SecurityRecommendation.Read.All Read threat and vulnerability management security recommendations -
The Permissions Panel will close. Click Grant admin consent for ... and confirm. All four permissions should now show a green checkmark under Status.
NoteIf you do not see
WindowsDefenderATPin the APIs my organization uses list, your tenant may not have the Defender for Endpoint service enabled. Contact your Azure administrator to verify that MDE is provisioned on the tenant.
No Additional Configuration is Needed in Compyl
Defender for Endpoint runs under the existing Azure integration. There is nothing additional to configure in Compyl. Once the permissions above are granted and admin-consented, the next Azure sync cycle will automatically begin pulling Defender for Endpoint data using the same Tenant ID, Client ID, Subscription ID, and Client Secret already saved on the Azure configuration tile.
FYIThe first sync after granting MDE permissions may take longer than usual because the full vulnerability catalog and per-machine installed software must be retrieved for the first time. Subsequent syncs are faster due to incremental loading for vulnerabilities.
Add Configuration
-
Navigate to the Integrations tab using the left-hand menu, find Azure, and select +Add Configuration.

-
Next, fill in the details below and select Continue.
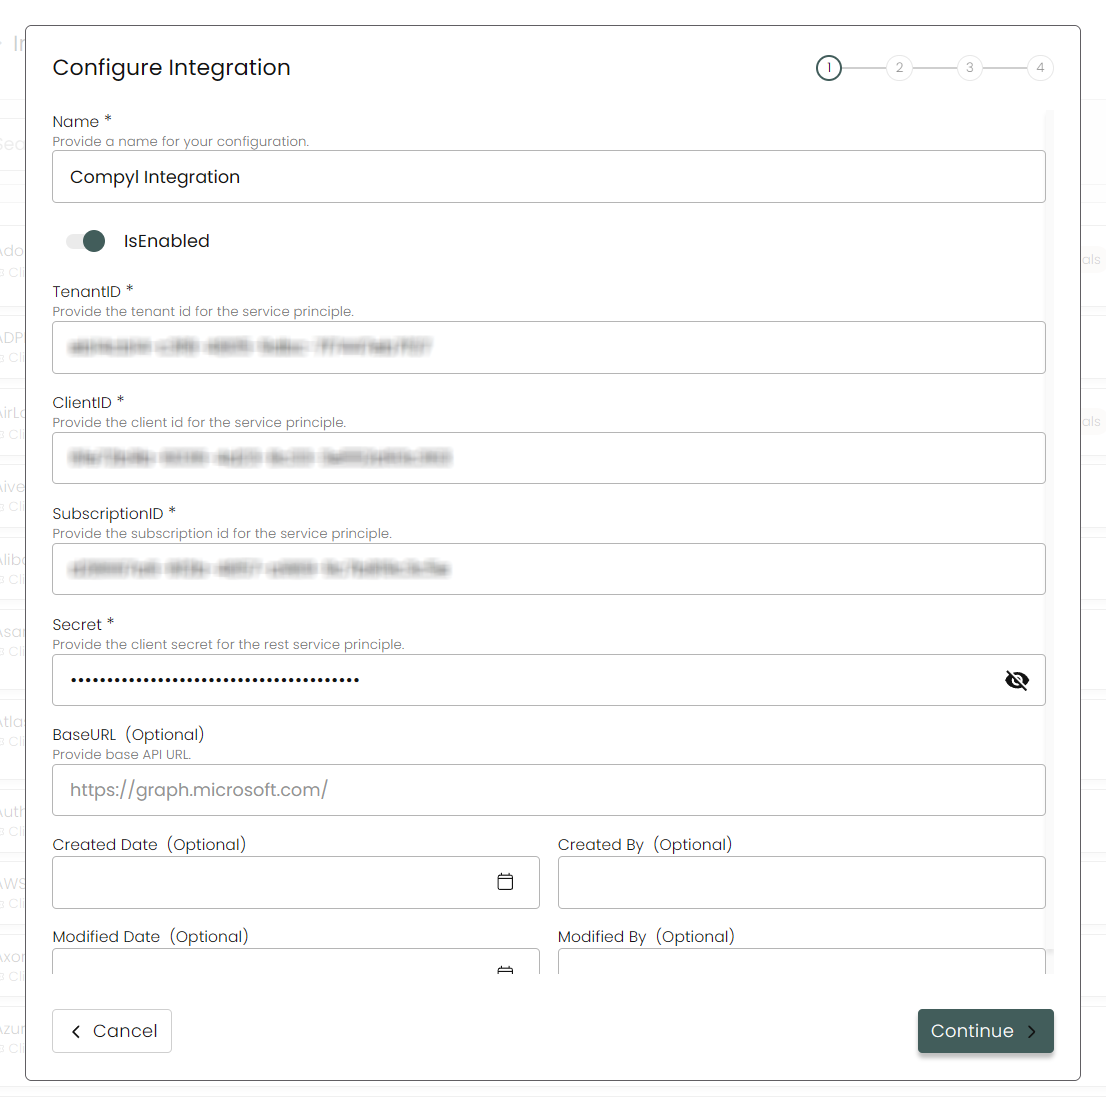
Name: Enter the name for the configuration.
is Enabled: Toggle button to ensure data is populated into Compyl.
Tenant ID and Client ID: This is obtained via Step 4 of Locate the Client ID
Subscription ID: Obtained in Setting a Subscription ID.
Secret: This is the Value obtained in the AzureAD Portal via the instructions above on creating the Secret Key.
-
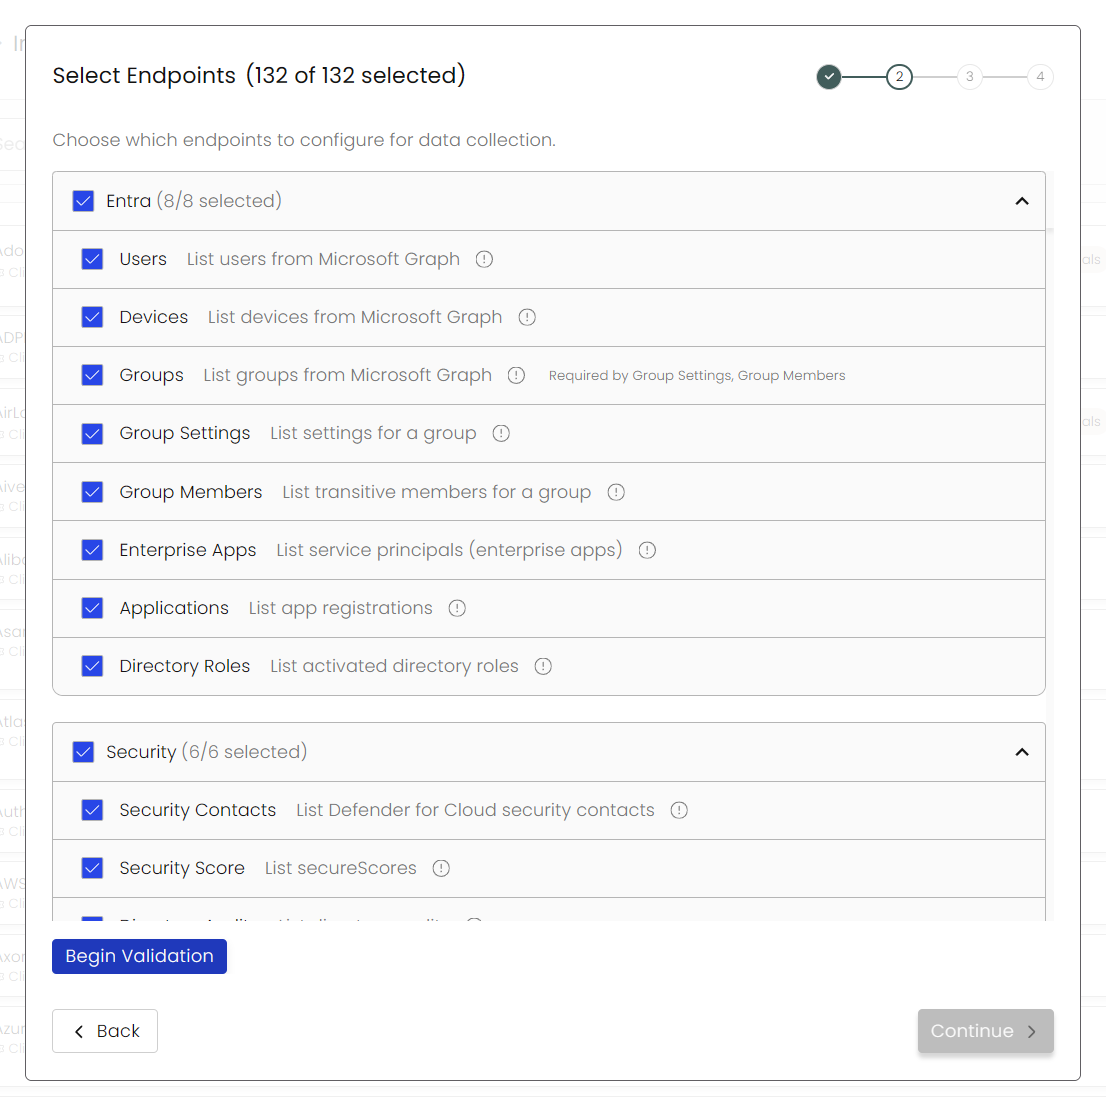
Choose your Endpoints and Begin Validation to validate your connection.
-
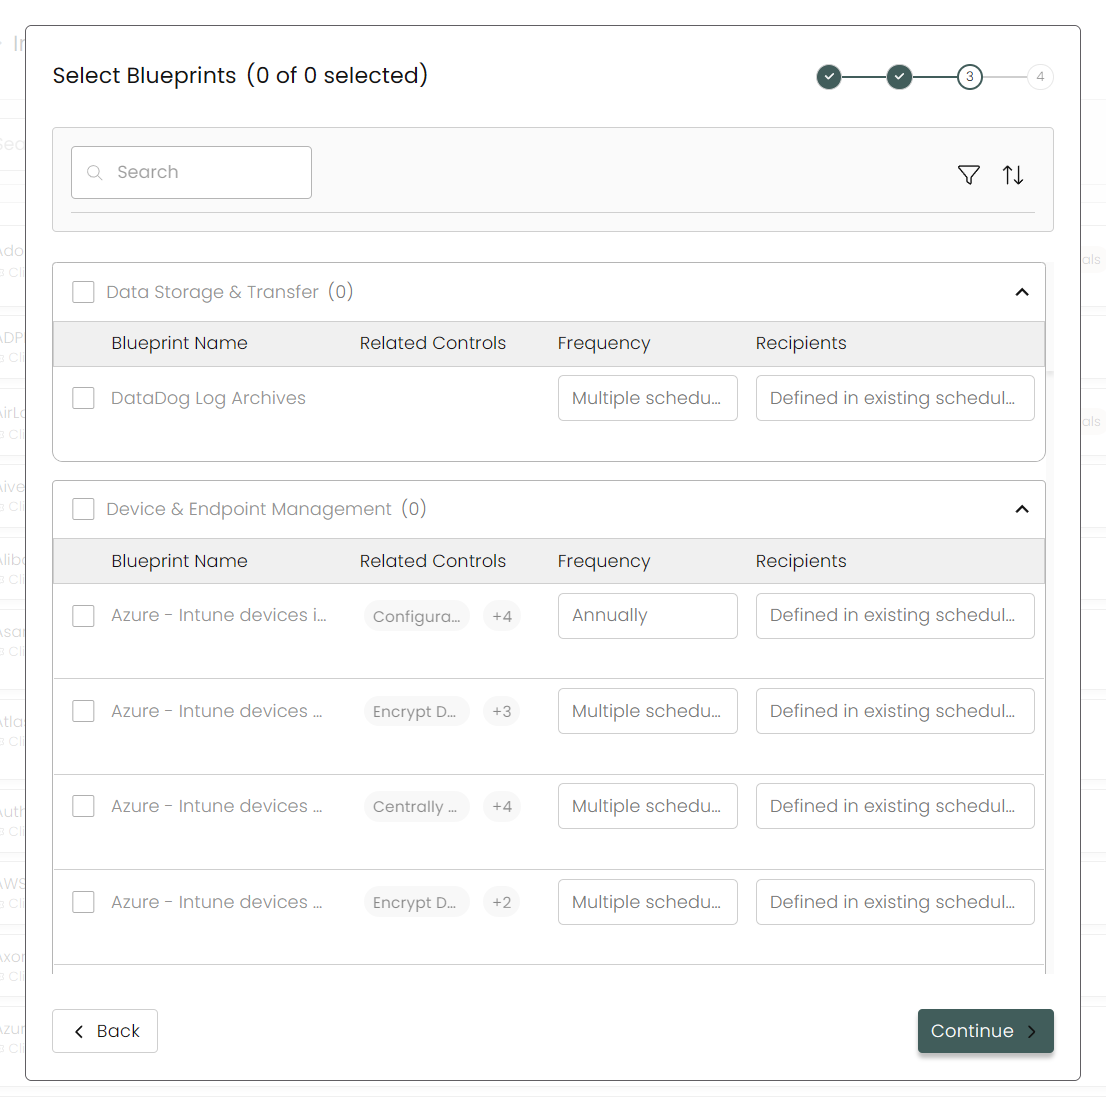
Select any Blueprints you wish to associate with this integration.
-
After you hit Continue, you'll see a summary screen. Click Return to Integrations to complete the configuration.
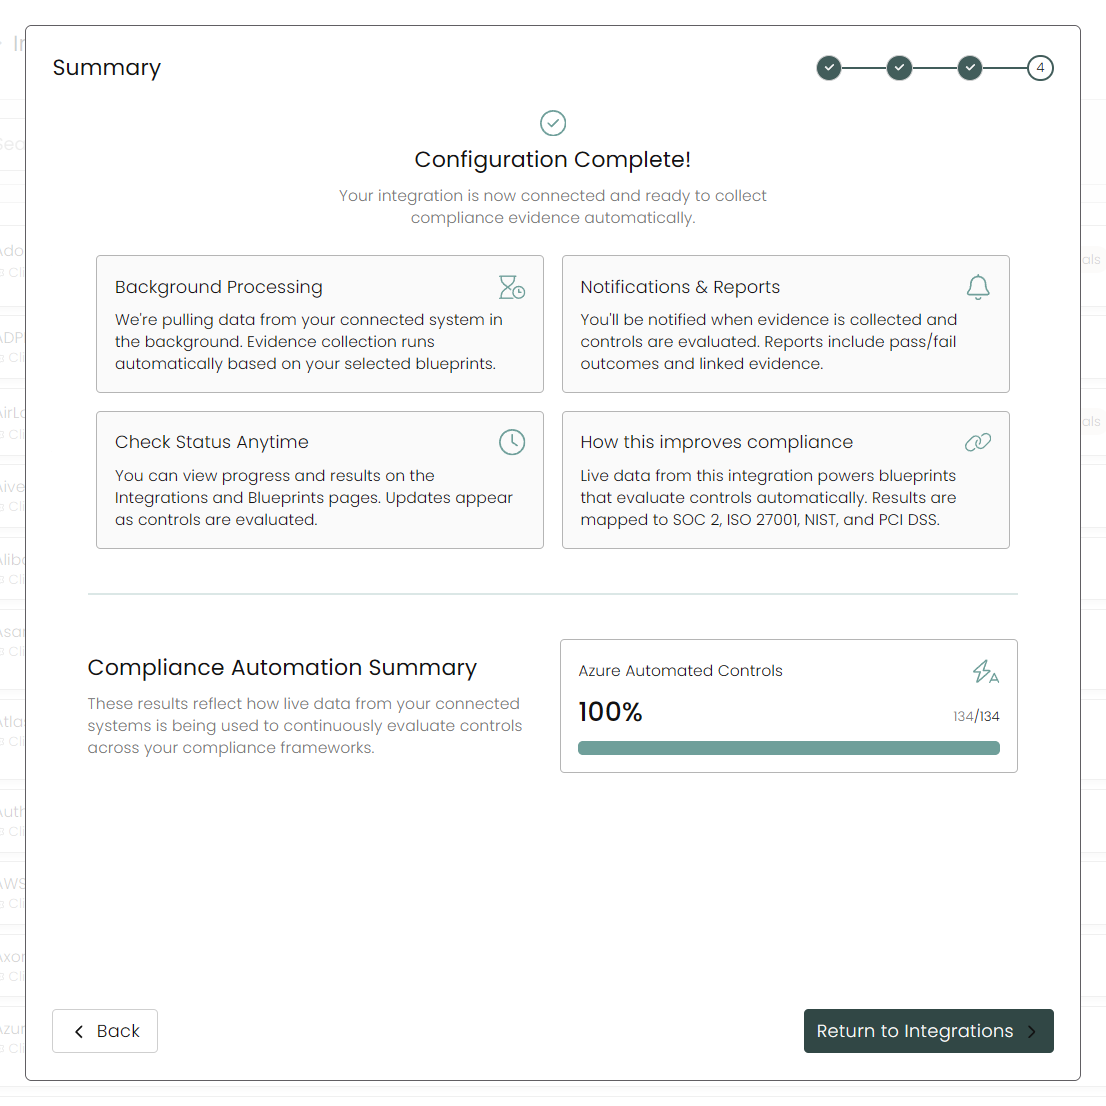
Once you have completed filling out the form click Return to Integrations.
You'll know the integration is successfully added when the status updates to Complete.

Data is synced on a recurring schedule configured by your Compyl administrator. Each sync pulls the latest data from all enabled endpoints.
FYII can take up to an hour or more for the integration to complete.
To query the data from the integration, refer to the Blueprints article.
Updated 2 months ago